SharePoint 4 Developers

Additional reference guide in .NET / SharePoint Development

ILSpy - Open-Source Tool

ILSpy is the open-source .NET assembly browser and decompiler.

Hi there,

A great tool was released this year to replace .NET reflector, that is not free anymore!

ILSpy is the open-source .NET assembly browser and decompiler:
http://wiki.sharpdevelop.net/ILSpy.ashx

From now on use this tool to investigate the Intermediate language. It does everything .NET Reflector did.

Cheers,

Marcel Medina

Click here to read the same content in Portuguese.

Silverlight SharePoint Web Parts

A new Visual Studio 2010 Extension was released recently, which installs Silverlight Web Part templates for SharePoint 2010, called Silverlight SharePoint Web Parts.

Hi folks,

A new Visual Studio 2010 Extension was released by Paul Stubbs recently, which installs Silverlight Web Part templates for SharePoint 2010, called Silverlight SharePoint Web Parts.

The task of creating Silverlight Web Parts is a little bit tricky, because of the required settings to be set against projects in Visual Studio, as you can check at: http://msdn.microsoft.com/en-us/library/ff798492.aspx

The nice thing about this new extension is that it takes advantage of SharePoint 2010 Power Tools to create Visual Web Parts in the Sandbox.

Installation

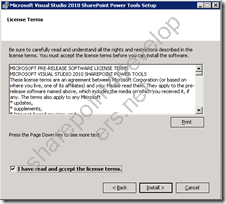
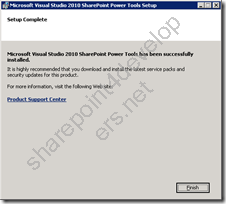
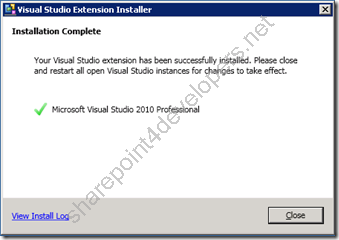
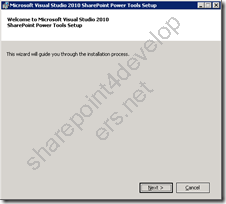
1) Install the extension Visual Studio 2010 SharePoint Power Tools.
1a1b1c
Figures 1,2,3 – Installation screenshots of the Visual Studio 2010 SharePoint Power Tools extension

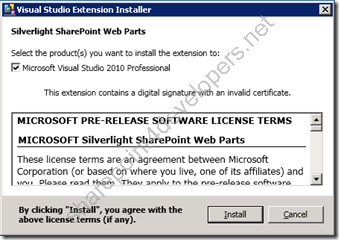
2) Install the extension Silverlight SharePoint Web Parts.
2a2b
Figures 4,5 – Installation screenshots of the Silverlight SharePoint Web Parts extension

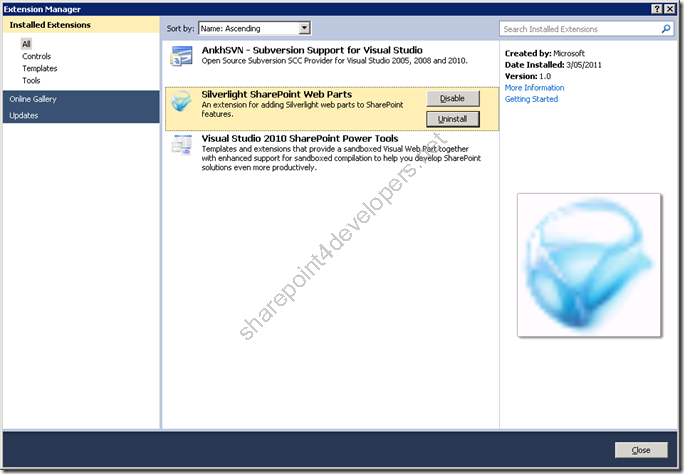
3) Open up the Visual Studio and check if the extensions are available. Go to Tools > Extension Manager:
3
Figure 6 – Extension Manager of Visual Studio 2010

New Templates

Just as a demo, let’s create an example of each new template and them make some comparisons. Something very simple like a Hello World. Follow the steps below:

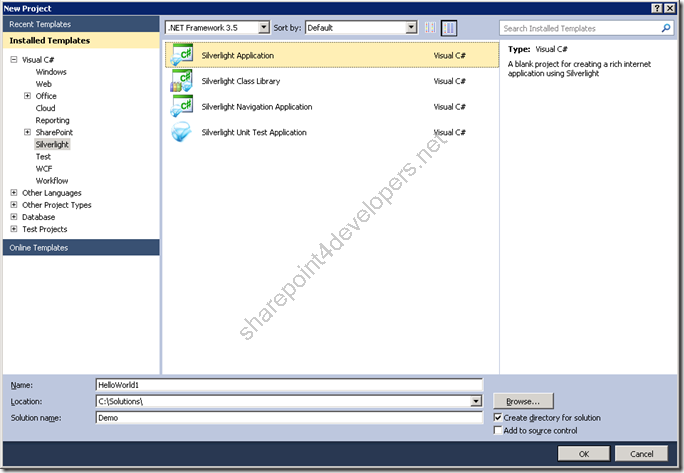
1) Create 2 new Silverlight Application projects. Name them as HelloWorld1 and HelloWorld2:
4a
Figure 7 – Creating a Silverlight Application

4b
Figure 8 – Silverlight 4

Note: Do the same for Hello World 2.

The solution should look like this:

5
Figure 9 – Hello World projects


2) Add the XAML code snippet on the pages MainPage.xaml of both projects:

Code Snippet
  1. <TextBlock Text="Hello World 1!" />


The final XAML should look like this:

Code Snippet
  1. <UserControl x:Class="HelloWorld1.MainPage"
  2.    xmlns="http://schemas.microsoft.com/winfx/2006/xaml/presentation"
  3.    xmlns:x="http://schemas.microsoft.com/winfx/2006/xaml"
  4.    xmlns:d="http://schemas.microsoft.com/expression/blend/2008"
  5.    xmlns:mc="http://schemas.openxmlformats.org/markup-compatibility/2006"
  6.    mc:Ignorable="d">
  7.  
  8.     <TextBlock Text="Hello World 1!" />
  9. </UserControl>


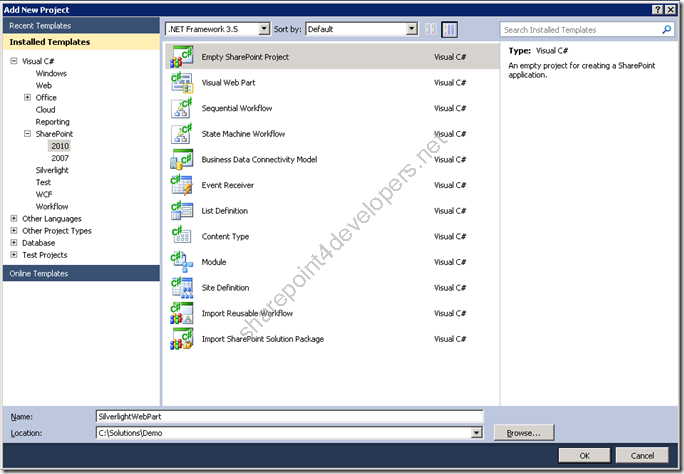
3) Add 2 new Empty SharePoint Projects to the solution. The first one called SilverlightWebPart (Figure 10) and the second one called SilverlightCustomWebPart:
6a
Figure 10 – Empty SharePoint Project

So far our solution should look like this:

7
Figura 11 – Projetos adicionados

4) For each new added project, Web Parts will be included.

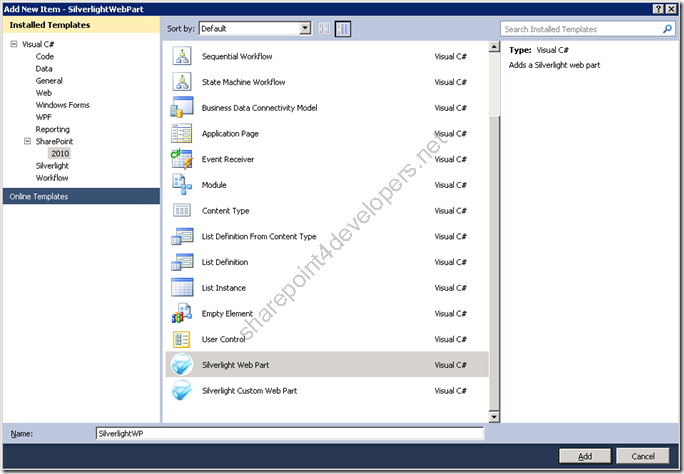
To begin add a Silverlight Web Part to the SilverlightWebPart project. Name it SilverlightWP (Figure 13).

Then select a Silverlight Custom Web Part, which is a Visual Web Part to be hosted in the sandbox. Add it to the SilverlightCustomWebPart project and name it SilverlightCustomWP.

8
Figure 12 – New templates

 8a
Figure 13 – Adding a Web Part

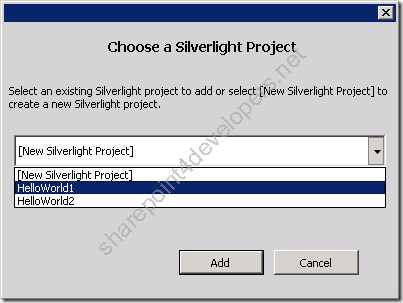
Due to the fact we have more than one Silverlight project, the extension displays a popup to select it according to the Figure 14:
8b
Figure 14 – Selecting a Silverlight project

Note: Select HelloWorld1 for SilverlightWebPart and HelloWorld2 for SilverlightCustomWebPart.

If we had one single Silverlight project, the popup wouldn’t be displayed and an automatic reference to the Silverlight project would be added.

Final Solution

The final result in both Silverlight Web Part projects is the creation of SharePoint Modules, which deploys xap files in the Master Page Gallery, Web Parts in the Web Part Gallery and pages against the Library SitePages.

The main difference of the SilverlightCustomWebPart project is the creation of a UserControl to host the xap file. This is interesting because it allows us to customise the UserControl so we can write javascript to integrate with the Silverlight application.

Check out the final solution:

9
Figure 15 – Final Solution

Here you get the results:

10a
10b
Figures 16 and 17 – Silverlight Web Parts

References:

http://visualstudiogallery.msdn.microsoft.com/e8360a85-58ca-42d1-8de0-e48a1ab071c7
http://visualstudiogallery.msdn.microsoft.com/8e602a8c-6714-4549-9e95-f3700344b0d9
http://channel9.msdn.com/Shows/SilverlightTV

Cheers,

Marcel Medina

Click here to read the same content in Portuguese.

Creating Document Sets Programmatically

In this post I will show how to create document sets programmatically, by exploring the assembly Microsoft.Office.DocumentManagement.dll, available at the directory \14\ISAPI.

Hi folks,

I have been requested to create lots of document sets in replacement of folders recently. It is easy to create document sets manually, but when you need to create lots of them, the best solution is to do it programmatically.

Document sets are more than simple folders. They hold metadata, which is changing the way users are working and they are taking advantage of it.

As a quick note, in this post I will show how to create document sets programmatically, by exploring the assembly Microsoft.Office.DocumentManagement.dll, available at the directory \14\ISAPI\.

The Solution

Basically this solution shows how to create a document set and add it to a Document Library.

Note: 2 content types were created manually for demonstration purposes: Word Template and Excel Spreadsheet Template.

Check this out:

Code Snippet
  1. static void Main(string[] args)
  2. {
  3.     var url = ConfigurationManager.AppSettings["Url"].ToString();
  4.     var sub = ConfigurationManager.AppSettings["Sub"].ToString();
  5.     var library = ConfigurationManager.AppSettings["Library"].ToString();
  6.  
  7.     using (SPSite site = new SPSite(url))
  8.     {
  9.         using (SPWeb web = (sub == "*") ? site.RootWeb : site.OpenWeb(sub))
  10.         {
  11.             string docsetName = "Document Set Test";
  12.             SPContentType ctype = null;
  13.  
  14.             if (web.ContentTypes[docsetName] == null)
  15.             {
  16.                 // Creating the document set (content type)
  17.                 ctype = new SPContentType(web.ContentTypes["Document Set"], web.ContentTypes, "Document Set Test");
  18.                 ctype.FieldLinks.Add(new SPFieldLink(web.Fields["Author"]));
  19.                 ctype.Group = "Test Content Types";
  20.                 web.ContentTypes.Add(ctype);
  21.  
  22.                 // Getting the document set (content type)
  23.                 DocumentSetTemplate docsetTemplate = DocumentSetTemplate.GetDocumentSetTemplate(ctype);
  24.  
  25.                 // Setting the content types
  26.                 docsetTemplate.AllowedContentTypes.Remove(web.ContentTypes["Document"].Id);
  27.                 docsetTemplate.AllowedContentTypes.Add(web.ContentTypes["Word Template"].Id);
  28.                 docsetTemplate.AllowedContentTypes.Add(web.ContentTypes["Excel Spreadsheet Template"].Id);
  29.  
  30.                 // Sharing fields
  31.                 docsetTemplate.SharedFields.Add(web.Fields["Author"]);
  32.  
  33.                 // Displaying fields
  34.                 docsetTemplate.WelcomePageFields.Add(web.Fields["Author"]);
  35.  
  36.                 // Adding default document
  37.                 FileStream wordFile = File.OpenRead(Path.GetFullPath(@"DocumentSet\Default.dotx"));
  38.                 byte[] binWordFile = new byte[wordFile.Length];
  39.                 wordFile.Read(binWordFile, 0, binWordFile.Length);
  40.  
  41.                 docsetTemplate.DefaultDocuments.Add("Default.dotx", web.ContentTypes["Word Template"].Id, binWordFile);
  42.  
  43.                 // Updating the document set (content type),    
  44.                 docsetTemplate.Update(true);
  45.                 ctype.Update();
  46.             }
  47.  
  48.             ctype = ctype jQuery15207137137458194047_1344344305332 web.ContentTypes[docsetName];
  49.  
  50.             if (web.Lists.TryGetList(library) == null)
  51.             {
  52.                 // Creating document library
  53.                 Guid libraryGuid = web.Lists.Add(library, "", SPListTemplateType.DocumentLibrary);
  54.                 SPDocumentLibrary list = (SPDocumentLibrary)web.Lists[libraryGuid];
  55.  
  56.                 // Setting properties
  57.                 list.OnQuickLaunch = true;
  58.                 list.ContentTypesEnabled = true;
  59.                 list.EnableFolderCreation = false;
  60.  
  61.                 // Defining content types
  62.                 list.ContentTypes.Delete(list.ContentTypes["Document"].Id);
  63.                 list.ContentTypes.Add(ctype);
  64.                 list.Update();
  65.  
  66.                 System.Collections.Hashtable properties = new System.Collections.Hashtable();
  67.                 properties.Add("DocumentSetDescription", "Just an example"); //InternalName
  68.                 properties.Add("_Author", "MM"); //InternalName
  69.  
  70.                 // Creating the document set
  71.                 DocumentSet.Create(list.RootFolder, "DocSet1", list.ContentTypes.BestMatch(ctype.Id), properties, true);
  72.             }
  73.         }
  74.     }
  75. }

Note: A Document Library is created dynamically for demonstration purposes.

Download the solution here.

I hope it helps. Smile

References:
http://technet.microsoft.com/en-us/library/ff603637.aspx
http://office.microsoft.com/en-us/sharepoint-server-help/CH010372625.aspx
http://msdn.microsoft.com/en-us/library/ee574540.aspx

Cheers,

Marcel Medina

Click here to read the same content in Portuguese.