SharePoint 4 Developers

Additional reference guide in .NET / SharePoint Development

Business Connectivity Services – Part III

Learn how to integrate WCF services in SharePoint 2010 through Business Connectivity Services. This is a very interesting approach because it allows that different services (including the cloud) to be integrated into SharePoint 2010.

Hi folks,

After a mini holiday here there is one more part of the BCS series, whose main approach is to show how to connect to different external data sources.

Learn how to integrate WCF services in SharePoint 2010 through Business Connectivity Services. This is a very interesting approach because it allows that different services (including the cloud) to be integrated into SharePoint 2010.

In this article a WCF service will be created, so an External Content Type (ECT) can be created.

Creating ECTs via Web Service (WCF)

In order to create ECTs via Web Service it is needed the utilisation of SPD2010 and in this case, due to the fact the Web Service is going to be coded from the scratch, VS2010 is required as well.

Use this type of approach in environments that:

  • Integrates with an external data source (i.e.: other systems), either on your Intranet or Internet;
  • There is a need for creating business rules (i.e.: any validation) which can be implemented during the creation of the Web Service;
  • Uses different databases rather than SQL Server, which can be implemented in a data access layer during the creation of the Web Service;

If you have this scenario, this implementation has a higher level of difficulty by creating the Web Service. Both VS2010 and SPD2010 are utilised, the former for the Web Service development and the latter for the configuration.

Working with Visual Studio 2010

The creation of the ECT in this approach is only possible with the existence of a Web Service, that's why a solution in VS2010 is going to be created. As already mentioned in the Block 1 of the BCS Architecture (Part I), both extensions .asmx (ASP.NET Web Service Application) and .svc (WCF Service Application) can be used in the creation of ECTs, and in this demonstration I am going to use a WCF Service Application.

Start VS2010, create a Blank Solution and add 3 projects according to the Figure 1:

solution

Figure 1 - Creating the Solution

Note: Delete the files *.cs and App.config that are created by default in new projects.

The solution was split into projects that represent the data access and business logic layers. Some references between the projects need to be added, according to the Table 1:

Project Reference
ContactServices.Business ContactServices.Data
ContactServices.Host ContactServices.Business
Table 1 - References

Note: In all code examples, my goal is just to show the functionality in creating an ECT in SharePoint 2010. Don’t forget to implement the best practices and patterns such as the Application Blocks (i.e.: Logging, Exception Handling, Security, etc...). I strongly recommend the use of Enterprise Library.

Data Access Layer

In order to create the project ContactServices.Data some objects that manipulate the database need to be added, and for demonstration purposes I use the LINQ to SQL because it is simpler to implement. Add this object to the project and name it Dev.dbml, then create a new connection that uses Windows Authentication using the Server Explorer, open the database and drag the table Contact (Part II) as displayed in Figure 2:

LINQtoSQL

Figure 2 - Adding table Contact

Create a class that contains CRUD methods, so the object Contact can be handled. To do that, create a class called ContactManager and add the code below, which comments tell by themselves:

Code Snippet
  1. public class ContactManager
  2. {
  3.     /// <summary>
  4.     /// Gets all the Contacts
  5.     /// </summary>
  6.     /// <returns>Contacts Array</returns>
  7.     public Contact[] GetContacts()
  8.     {
  9.         var contacts = new List<Contact>();
  10.  
  11.         using (DevDataContext dev = new DevDataContext())
  12.         {
  13.             contacts = (from cont in dev.Contacts
  14.                         select cont).ToList();
  15.         }
  16.         return contacts.ToArray();
  17.     }
  18.  
  19.     /// <summary>
  20.     /// Gets a specific Contact
  21.     /// </summary>
  22.     /// <param name="contactId">Contact Id</param>
  23.     /// <returns>Returns the Contact</returns>
  24.     public Contact GetContactById(int contactId)
  25.     {
  26.         var contact = new Contact();
  27.  
  28.         using (DevDataContext dev = new DevDataContext())
  29.         {
  30.             contact = (from cont in dev.Contacts
  31.                         where cont.ContactID == contactId
  32.                         select cont).First();
  33.         }
  34.         return contact;
  35.     }
  36.  
  37.     /// <summary>
  38.     /// Updates a specific Contact
  39.     /// </summary>
  40.     /// <param name="contact">Contact to be updated</param>
  41.     public void UpdateContact(Contact contact)
  42.     {
  43.         var contactDB = new Contact();
  44.  
  45.         using (DevDataContext dev = new DevDataContext())
  46.         {
  47.             contactDB = (from cont in dev.Contacts
  48.                             where cont.ContactID == contact.ContactID
  49.                             select cont).First();
  50.  
  51.             // Alters the object
  52.             contactDB.Address = contact.Address;
  53.             contactDB.City = contact.City;
  54.             contactDB.CompanyName = contact.CompanyName;
  55.             contactDB.ContactName = contact.ContactName;
  56.             contactDB.ContactTitle = contact.ContactTitle;
  57.             contactDB.Country = contact.Country;
  58.             contactDB.Email = contact.Email;
  59.             contactDB.Fax = contact.Fax;
  60.             contactDB.Phone = contact.Phone;
  61.             contactDB.PostalCode = contact.PostalCode;
  62.             contactDB.Region = contact.Region;
  63.  
  64.             dev.Refresh(System.Data.Linq.RefreshMode.KeepChanges, contactDB);
  65.             dev.SubmitChanges();
  66.         }
  67.     }
  68.  
  69.     /// <summary>
  70.     /// Adds a Contact
  71.     /// </summary>
  72.     /// <param name="contact">New Contact</param>
  73.     public void AddContact(Contact contact)
  74.     {
  75.         using (DevDataContext dev = new DevDataContext())
  76.         {
  77.             dev.Contacts.InsertOnSubmit(contact);
  78.             dev.SubmitChanges();
  79.         }
  80.     }
  81.  
  82.     /// <summary>
  83.     /// Deletes a Contacts
  84.     /// </summary>
  85.     /// <param name="contactId">Contact Id</param>
  86.     public void DeleteContact(int contactId)
  87.     {
  88.         using (DevDataContext dev = new DevDataContext())
  89.         {
  90.             var contact = (from cont in dev.Contacts
  91.                             where cont.ContactID == contactId
  92.                             select cont).First();
  93.             dev.Contacts.DeleteOnSubmit(contact);
  94.             dev.SubmitChanges();
  95.         }
  96.     }
  97. }

Business Logic Layer

The project ContactServices.Business should contain Interfaces and Classes that call methods of the ContactServices.Data project. Creating Interfaces are important because of 3 main reasons in this Solution:

  • Establishes a contract for methods;
  • Sets a behaviour in classes that implement them;
  • Utilisation by WCF Service Application (project ContactServices.Host);

To perform that, create the interface IContactServices and the class called ContactServices that implements it, according to the code below:

Code Snippet
  1. [ServiceContract]
  2. public interface IContactServices
  3. {
  4.     [OperationContract]
  5.     Contact[] GetContacts();
  6.  
  7.     [OperationContract]
  8.     Contact GetContactById(int contactId);
  9.  
  10.     [OperationContract]
  11.     void UpdateContact(Contact contact);
  12.  
  13.     [OperationContract]
  14.     void AddContact(Contact contact);
  15.  
  16.     [OperationContract]
  17.     void DeleteContact(int contactId);
  18. }


Code Snippet
  1. public class ContactServices : IContactServices
  2. {
  3.     #region IContactServices Members
  4.  
  5.     public Contact[] GetContacts()
  6.     {
  7.         // Create your own business rules
  8.         return new ContactManager().GetContacts();
  9.     }
  10.  
  11.     public Contact GetContactById(int contactId)
  12.     {
  13.         // Create your own business rules
  14.         return new ContactManager().GetContactById(contactId);
  15.     }
  16.  
  17.     public void UpdateContact(Contact contact)
  18.     {
  19.         // Create your own business rules
  20.         new ContactManager().UpdateContact(contact);
  21.     }
  22.  
  23.     public void AddContact(Contact contact)
  24.     {
  25.         // Create your own business rules
  26.         new ContactManager().AddContact(contact);
  27.     }
  28.  
  29.     public void DeleteContact(int contactId)
  30.     {
  31.         // Create your own business rules
  32.         new ContactManager().DeleteContact(contactId);
  33.     }
  34.  
  35.     #endregion
  36. }


The class ContactServices contains CRUD methods that are going to be used by the BCS and tell by themselves. They work as a "thin layer" for handling data, because directly call the ContactManager methods in the project ContactServices.Data.

In this example no business rules were implemented, but you can if you need them. Just code against the methods above.

Service Host

The project ContactServices.Host was created to work as the WCF Service host, which let methods to be available for BCS consuming. Start renaming the file Service1.svc to ContactServices.svc and update the service reference at the page directive:

Code Snippet
  1. <%@ ServiceHost Language="C#" Debug="true" Service="ContactServices.Business.ContactServices" %>


This change is necessary because the ContactServices class needs to be mapped, which was implemented in the project ContactServices.Business. An update in the Web.config is also necessary, by editing it in the WCF Service Configuration Editor (available in the VS2010) or directly in the section system.serviceModel according to the code below:

Code Snippet
  1. <system.serviceModel>
  2.     <services>
  3.       <service behaviorConfiguration="ContactServicesBehavior" name="ContactServices.Business.ContactServices">
  4.         <endpoint binding="wsHttpBinding" bindingConfiguration="" contract="ContactServices.Business.IContactServices" />
  5.         <endpoint address="mex" binding="mexHttpBinding" bindingConfiguration="" contract="ContactServices.Business.IContactServices" />
  6.       </service>
  7.     </services>
  8.     <behaviors>
  9.       <serviceBehaviors>
  10.         <behavior name="ContactServicesBehavior">
  11.           <serviceMetadata httpGetEnabled="true" />
  12.           <serviceDebug includeExceptionDetailInFaults="true" />
  13.         </behavior>
  14.       </serviceBehaviors>
  15.     </behaviors>
  16.   </system.serviceModel>

Note: The behavior serviceDebug contains the attribute includeExceptionDetailInFaults to list in details any Web Service problem in the SharePoint Log, which is very useful during the WCF integration tests.

In the end, your solution should be similar to the Figure 3:

vstudio

Figure 3 – Final Solution

Deploy the solution in the IIS, so you can get the Url for creating the ECT, as demonstrated in the next sections.

Working with SharePoint Designer 2010

At this stage the solution was already created, and now the ECT needs to be created, by mapping the Web Service methods and parameters. The Figure 1 (Part II) displays the first step in creating the ECT, afterwards add a new connection (1) to the Web Service by choosing the External Data Source Type (2), according to the Figure 4:

conexao

Figure 4 - Creating a new connection

Set the connection parameters according to the Figure 5:

WCF

Figure 5 – WCF Connection details

Note: Some important considerations:

  • The WCF metadata can be obtained through WSDL or endpoint Mex. Both of them can be informed in the fields Service Metadata URL / Metadata Connection Mode, and are available in this solution.
  • The User’s Identity can be used to connect to the WCF service and hence to the database, that’s why the Windows Authentication is required.

After creating the WCF connection the CRUD operations need to be mapped. This is the stage in which the Web Service methods and parameters should be mapped for the creation of the ECT. For each figure below there is an operation whose parameters are displayed in tables:

addcontact

Figure 6 - AddContact Operation Properties

The operation AddContact as shown in Figure 6 has the following Input parameters according to the Tables 2 and 3:

Element .NET Type Map to Identifier Identifier Field Display Name Foreign Identifier
ContactID System.Int32 TRUE ContactID ContactID ID  
Address System.String FALSE   Address Address  
City System.String FALSE   City City  
CompanyName System.String FALSE   CompanyName Company Name  
ContactName System.String FALSE   ContactName Contact Name  
ContactTitle System.String FALSE   ContactTitle Contact Title  
Country System.String FALSE   Country Country  
Email System.String FALSE   Email E-mail  
Fax System.String FALSE   Fax Fax  
Phone System.String FALSE   Phone Phone  
PostalCode System.String FALSE   PostalCode Postal Code  
Region System.String FALSE   Region Region  
Table 2 - AddContact Operation Input Parameters

Element Default Value Filter Element Path
ContactID <<None>>   contact.ContactID
Address <<None>>   contact.Address
City <<None>>   contact.City
CompanyName <<None>>   contact.CompanyName
ContactName <<None>>   contact.ContactName
ContactTitle <<None>>   contact.ContactTitle
Country <<None>>   contact.Country
Email <<None>>   contact.Email
Fax <<None>>   contact.Fax
Phone <<None>>   contact.Phone
PostalCode <<None>>   contact.PostalCode
Region <<None>>   contact.Region
Table 3 - AddContact Operation Input Parameters (Continuation)

There are no Return parameters to be configured for the operation AddContact, so simply ignore the configuration screen and finish this mapping.

deletecontact

Figure 7 - DeleteContact Operation Properties

The operation DeleteContact as shown in Figure 7 has the following Input parameter according to the Table 4:

Element .NET Type Map to Identifier Identifier Display Name Default Value Filter Element Path
contactId System.Int32 TRUE ContactID ID <<None>>   contactId
Table 4 - DeleteContact Operation Input Parameters

getcontactbyid

Figure 8 - GetContactById Operation Properties

The operation GetContactById as shown in Figure 8 has the following Input and Return parameters according to the Tables 5, 6 and 7:

Element .NET Type Map to Identifier Identifier Display Name Default Value Filter Element Path
contactId System.Int32 TRUE ContactID ID <<None>>   contactId
Table 5 - GetContactById Operation Input Parameters

Data Source Element .NET Type Map to Identifier Identifier Field Display Name Foreign Identifier
ContactID System.Int32 TRUE ContactID ContactID ID  
Address System.String FALSE   Address Address  
City System.String FALSE   City City  
CompanyName System.String FALSE   CompanyName Company Name  
ContactName System.String FALSE   ContactName Contact Name  
ContactTitle System.String FALSE   ContactTitle Contact Title  
Country System.String FALSE   Country Country  
Email System.String FALSE   Email E-mail  
Fax System.String FALSE   Fax Fax  
Phone System.String FALSE   Phone Phone  
PostalCode System.String FALSE   PostalCode Postal Code  
Region System.String FALSE   Region Region  
Table 6 - GetContactById Operation Return Parameters

Data Source Element Element Path Required Read-Only Office Property
ContactID GetContactById.ContactID FALSE TRUE Custom Property
Address GetContactById.Address FALSE FALSE Business Address (BusinessAddress)
City GetContactById.City FALSE FALSE Business Address City (BusinessAddressCity)
CompanyName GetContactById.CompanyName FALSE FALSE Company Name (CompanyName)
ContactName GetContactById.ContactName TRUE FALSE Full Name (FullName)
ContactTitle GetContactById.ContactTitle FALSE FALSE Title (Title)
Country GetContactById.Country FALSE FALSE Business Address Country/Region (BusinessAddressCountry)
Email GetContactById.Email TRUE FALSE Email 1 Address (Email1Address)
Fax GetContactById.Fax FALSE FALSE Business Fax Number (BusinessFaxNumber)
Phone GetContactById.Phone TRUE FALSE Business Telephone Number (BusinessTelephoneNumber)
PostalCode GetContactById.PostalCode FALSE FALSE Business Address Postal Code (BusinessAddressPostalCode)
Region GetContactById.Region FALSE FALSE Business Address State (BusinessAddressState)
Table 7 - GetContactById Operation Return Parameters (Continuation)

getcontacts

Figure 9 - GetContacts Operation Properties

The operation GetContacts as shown in Figure 9 does not have Input parameters to be configured, but has the following Return parameters according to the Tables 8 and 9:

Element .NET Type Map to Identifier Identifier Field Display Name Foreign Identifier
ContactID System.Int32 TRUE ContactID ContactID ID  
Address System.String FALSE   Address Address  
City System.String FALSE   City City  
CompanyName System.String FALSE   CompanyName Company Name  
ContactName System.String FALSE   ContactName Contact Name  
ContactTitle System.String FALSE   ContactTitle Contact Title  
Country System.String FALSE   Country Country  
Email System.String FALSE   Email E-mail  
Fax System.String FALSE   Fax Fax  
Phone System.String FALSE   Phone Phone  
PostalCode System.String FALSE   PostalCode Postal Code  
Region System.String FALSE   Region Region  
Table 8 - GetContacts Operation Return Parameters

Element Element Path Required Read-Only Show in Picker Timestamp Field
ContactID GetContacts.GetContactsElement.ContactID FALSE TRUE FALSE FALSE
Address GetContacts.GetContactsElement.Address FALSE FALSE FALSE FALSE
City GetContacts.GetContactsElement.City FALSE FALSE FALSE FALSE
CompanyName GetContacts.GetContactsElement.CompanyName FALSE FALSE FALSE FALSE
ContactName GetContacts.GetContactsElement.ContactName TRUE FALSE FALSE FALSE
ContactTitle GetContacts.GetContactsElement.ContactTitle FALSE FALSE FALSE FALSE
Country GetContacts.GetContactsElement.Country FALSE FALSE FALSE FALSE
Email GetContacts.GetContactsElement.Email TRUE FALSE FALSE FALSE
Fax GetContacts.GetContactsElement.Fax FALSE FALSE FALSE FALSE
Phone GetContacts.GetContactsElement.Phone TRUE FALSE FALSE FALSE
PostalCode GetContacts.GetContactsElement.PostalCode FALSE FALSE FALSE FALSE
Region GetContacts.GetContactsElement.Region FALSE FALSE FALSE FALSE
Table 9 - GetContacts Operation Return Parameters (Continuation)

updatecontact

Figure 10 - UpdateContact Operation Properties

The operation UpdateContact as shown in Figure 10 has the following Input parameters according to the Tables 10 and 11:

Element .NET Type Map to Identifier Identifier Field Display Name Foreign Identifier
ContactID System.Int32 TRUE ContactID ContactID ID  
Address System.String FALSE   Address Address  
City System.String FALSE   City City  
CompanyName System.String FALSE   CompanyName Company Name  
ContactName System.String FALSE   ContactName Contact Name  
ContactTitle System.String FALSE   ContactTitle Contact Title  
Country System.String FALSE   Country Country  
Email System.String FALSE   Email E-mail  
Fax System.String FALSE   Fax Fax  
Phone System.String FALSE   Phone Phone  
PostalCode System.String FALSE   PostalCode Postal Code  
Region System.String FALSE   Region Region  
Table 10 - UpdateContact Operation Input Parameters

Element Default Value Filter Element Path
ContactID <<None>>   contact.ContactID
Address <<None>>   contact.Address
City <<None>>   contact.City
CompanyName <<None>>   contact.CompanyName
ContactName <<None>>   contact.ContactName
ContactTitle <<None>>   contact.ContactTitle
Country <<None>>   contact.Country
Email <<None>>   contact.Email
Fax <<None>>   contact.Fax
Phone <<None>>   contact.Phone
PostalCode <<None>>   contact.PostalCode
Region <<None>>   contact.Region
Table 11 - UpdateContact Operation Input Parameters (Continuation)

Note: Notice that in most cases just the configuration parameters (columns) nomenclature changes, but data is the same. I have decided to create configuration tables for each operation in order to facilitate the mapping with separate operations.

Once all the columns were set properly, save the ECT (1) and check the operations created (2), which can be edited at any time, according to the Figure 11:

savingECT

Figure 11 - Saving the ECT

Now it is possible to create an External List that will provide a visual interface for the external data in SharePoint 2010. In the same screen of External Content Types, choose the option External List on the context menu. Name it to “Contacts”, according to the Figure 12:

createECT

Figure 12 - Creating an External List

When the External List is created, the purpose of this article is accomplished. Now it is up to you to test the External List, which was already explained in the Part II. Reuse the same test and apply it here, since it was created for this purpose.

The fact of using a Web Service for integration in SharePoint 2010 shows us that it is possible to transmit data from and to any system that provides this interface. Unify data from different systems in SharePoint 2010! Now you know how to do it!

Reference:
http://msdn.microsoft.com/en-us/library/ee556826(v=office.14).aspx

Cheers

Marcel Medina

Click here to read the same content in Portuguese.

Article published in the Codificando .Net e-Magazine

My article about the SharePoint 2010 Developer Dashboard was published in the Revista Codificando .Net e-Magazine issue (17 issue).
Issue17

Hi folks, just would like to inform that in this Revista Codificando .Net e-Magazine issue my article about the SharePoint 2010 Developer Dashboard was published!

This issue was totally dedicated to SharePoint 2010, in which many SharePoint experts discuss various topics. This issue is an outcome of the partnership between the technical communities Codificando .Net and CanalSharePoint.

My article in particular talks about the Developer Dashboard and its activation modes. I also demonstrate how to develop a feature to facilitate its utilisation and show how to visualise the dashboard data graphically.

Check it now!

Link to the magazine: http://www.codificandomagazine.com.br/revista/post/Edicao-17.aspx

Cheers

Marcel Medina

Click here to read the same content in Portuguese.

SharePoint 2010 Content Type Hub

In this article we will check out a new feature in SharePoint Server 2010 called Content Type Hub, which allows the Content Types centralisation and sharing through the Metadata Service Application. You will understand how it works, how to configure it, how to publish and consume Content Types and some troubleshooting.

Hi folks,

In this article we will check out a new feature in SharePoint Server 2010 called Content Type Hub, which allows the centralisation and sharing of Content Types through the Metadata Service Application. You will understand how it works, how to configure it, how to publish and consume Content Types and also some troubleshooting.

How it works

Widely discussed when using MOSS 2007, the Content Type Sharing was always problematic, because once the Content Types are created in a single Site Collection, they cannot be shared among other Site Collections (there is no OOTB resource for that).

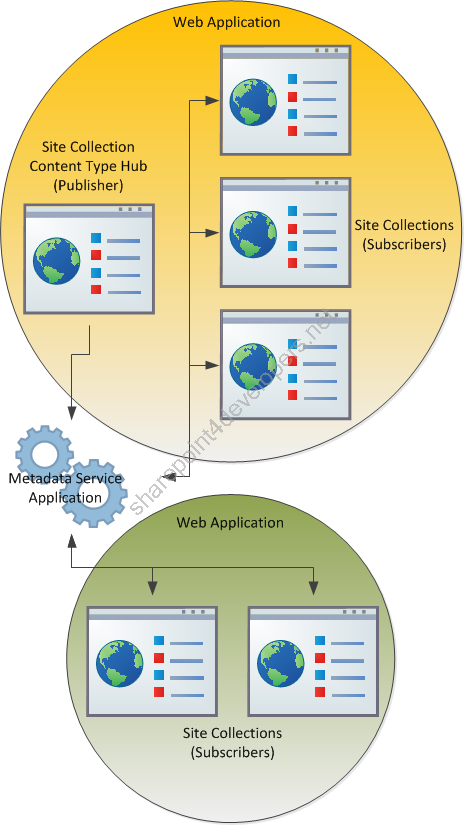
This new feature is available through the Metadata Services Application, which maps the Site Collection in which the Content Types are shared, working like a Hub.

The Figure 1 below displays how a Content Type Hub works:
 MSA
Figure 1 – The operation of a Content Type Hub (Publisher x Subscribers)

The concept of its operation is very simple, basically the Content Type Hub publishes the Content Types and through the Metadata Service Application they are replicated to the Subscribers. These subscribers can be Site Collections that are in different Web Applications even in different Farms (if you wish it).

Content Types Synchronism is done by 2 Timer Jobs that are executed in the background. They are:

  • Content Type Hub – Responsible for managing the Content Types to be published.
  • Content Type Subscriber – Responsible for publishing the Content Types from the Hub to the Content Type Gallery of the Site Collection.

Configuration

Site Collection (Content Type Hub)

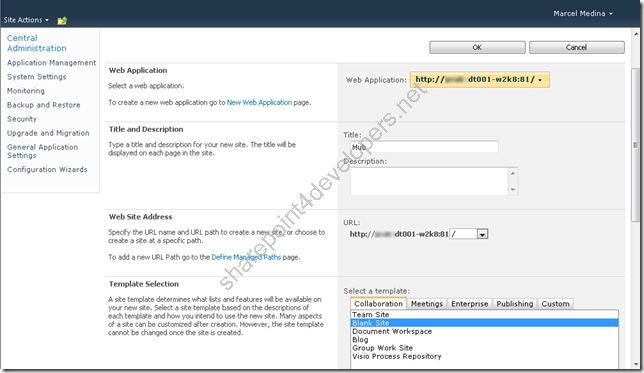
A Site Collection needs to be created firstly to serve as the Content Type Hub, in order to do that go to the Central Administration > Application Management > Create Site Collections and create a new Site Collection, according the Figure 2:
 sitecol
Figure 2 – Site Collection Creation

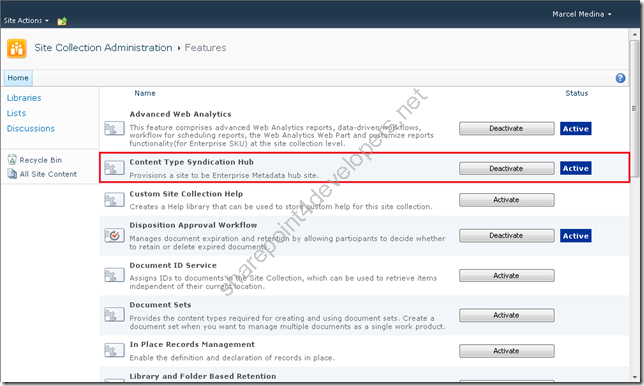
Shortly after that, enable the Feature Content Type Syndication Hub for the Site Collection in the Site Actions > Site Settings > Site collection features, according the Figure 3:
 feature1
Figure 3 – Feature Activation - Content Type Syndication Hub

Note: At the moment this Feature is activated the Site Collection is provisioned as the Content Type Hub.

Metadata Service Application

The Metadata Application Service is a service for sharing metadata, whose main feature is the storage of keywords and term sets (which is not discussed in this paper) and as optional feature to serve as a Hub for Content Types.

In the Farm is possible to have zero or more Metadata Service Applications and this criterion depends entirely on the Design of your solution. In this approach we need only one running service application whose connection will consume only one Content Type Hub. In order to consume more than one Content Type Hub, you need to create another service application for that. This is applicable in case you want to create different scopes for Content Types, e.g. the separation of Content Type Hubs for consumption in an Intranet Web Site and the other one in an Internet Web Site.

Here we are addressing only the planning of the Metadata Application Service as a Hub for Content Types, but if you're interested in exploring more about this service application, see the references in this article.

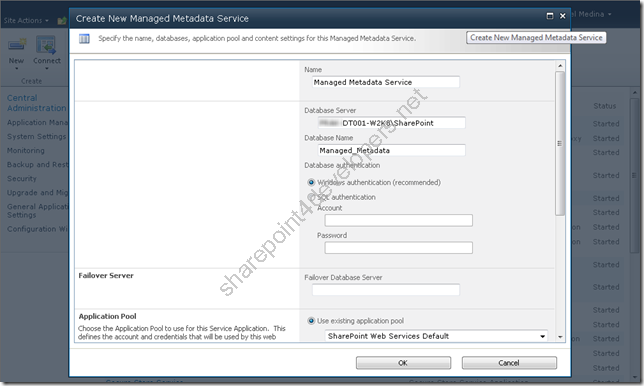
The Metadata Service Application can be created through Central Administration > Application Management > Manage Service Applications > New > Managed Metadata Service. The Figures 4 and 5 display the necessary data for that:
 metadata3
Figure 4 – Creating a new Metadata Service Application (1/2)
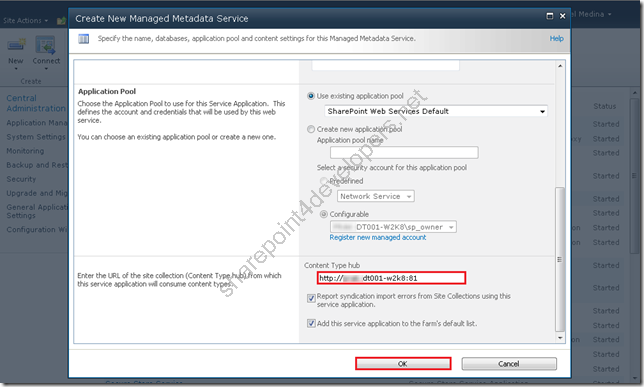
 metadata4
Figure 5 – Creating a new Metadata Service Application (2/2)

Note: An important point to be commented is that once the URL Configuration for the Content Type Hub is set, this cannot be changed by the user interface. If you want to change it after the Service Application is created, use this approach for updating the Metadata Service Application.

As we will not use the Metadata Service Application for storing keywords and term sets, disable the default storage location of this service application in Central Administration > Application Management > Manage Service Applications by selecting the Managed Metadata Service Connection and clicking Properties, according the Figure 6:
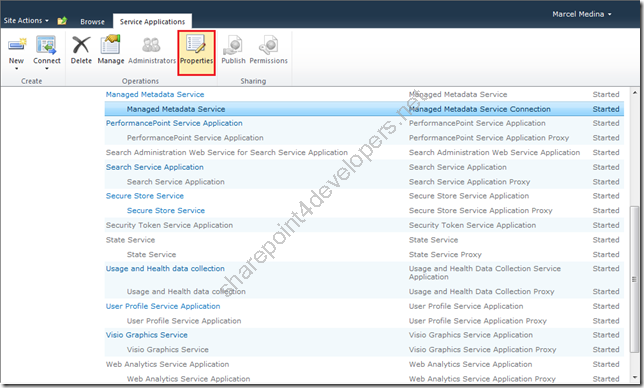
 metadataconn
Figure 6 – Settings of the Metadata Service Connection (1/2)

Shortly after that, uncheck the checkboxes according the Figure 7:
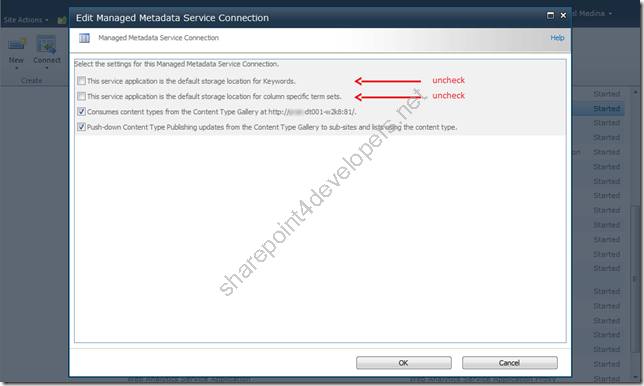
metadataconn2
Figure 7 – Settings of the Metadata Service Connection (2/2)

OBS: Only one default storage location for keywords and term sets is allowed in a Web Application, thus let these options available until you decide to use them.

Publishing

The Site Columns and Content Types referenced in the posts Creating Site Columns Programmatically via XML and Creating Content Types Programmatically via XML are going to be used in the Hub, because they will serve us as examples of Content Types to be published.

Note: Just deploy the Site Columns using the script provided. Use another approach for deploying the Content Types, according to this post SharePoint Lesson Series – Lesson 2 – Content Types – Part I.

Once these objects are created, start publishing the Content Types. This task can be done manually or programmatically. I'll show you both.

It is worth remembering that, only for purposes of understanding, Content Type Syndication is the definition to the way that Content Types are organized and shared between Lists and Libraries, which is precisely what we are doing with their publishing using the Content Type Hub.

Manual

In this type of publishing go to Site Actions > Site Settings > Site Content Types and for each Content Type created, under the Settings go to Manage publishing for this content type as shown in the Figure 8 below:
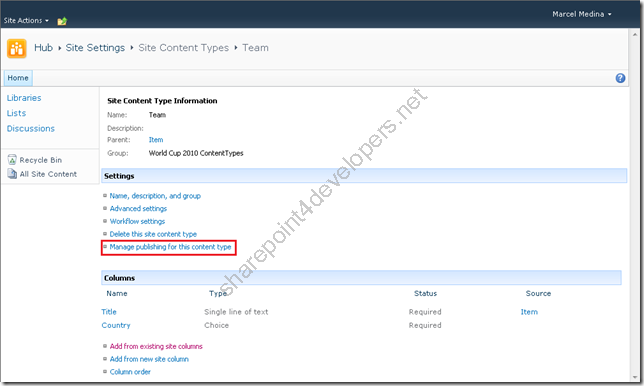
publishing
Figure 8 – Manual Publishing of Content Types (1/2)

Shortly after that, one of the options for publishing is available, according the Figure 9:
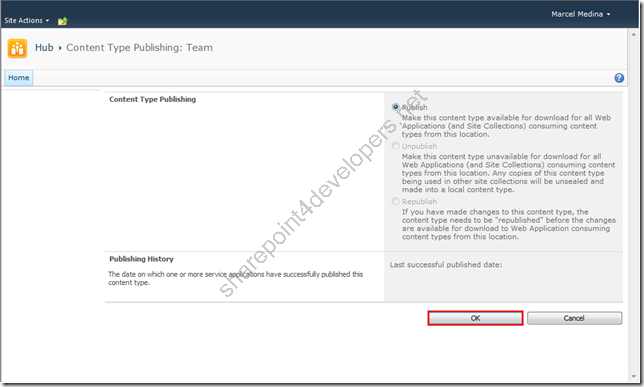
publishing2  
Figure 9 – Manual Publishing of Content Types (2/2)

Note: Because we are publishing it for the first time, only the Publish option is available. If you have already published the Content Type, the other two options are available and the current disabled.

Just for clarification, I am commenting on the publishing options:

  • Publish – The Content Type is delivered for being consumed in other Site Collections that reference it.
  • Unpublish – The Content Type is retracted. Its copy remains in the other Site Collections, however its status changes to be no longer Read-Only.
  • Republish – Redo the Content Type Publishing. It should be applied in cases where there was some change in it.

Coding

If you prefer to automate the publishing process (especially if you have multiple Content Types), use the code below for this task.

Code Snippet
  1. using System;
  2. using System.Collections.Generic;
  3. using System.Linq;
  4. using System.Text;
  5. using System.IO;
  6. using CommonLibrary;
  7. using Microsoft.SharePoint;
  8. using Microsoft.SharePoint.Taxonomy;
  9. using Microsoft.SharePoint.Taxonomy.ContentTypeSync;
  10. using System.Configuration;
  11.  
  12. namespace PublishingContentTypes
  13. {
  14.     public class Program
  15.     {
  16.         public static void Main()
  17.         {
  18.             try
  19.             {
  20.                 string url = ConfigurationManager.AppSettings["Url"].ToString();
  21.                 bool publish = bool.Parse(ConfigurationManager.AppSettings["Publish"].ToString());
  22.  
  23.                 using (SPSite site = new SPSite(url))
  24.                 {
  25.                     using (SPWeb web = site.RootWeb)
  26.                     {
  27.                         string contentTypeXml = Path.GetFullPath("ContentTypes.xml");
  28.  
  29.                         List<string> list = XMLHelper.ReadXML(contentTypeXml);
  30.  
  31.                         foreach (string item in list)
  32.                         {
  33.                             SPContentType ctype = web.ContentTypes[item];
  34.                             if (ctype != null)
  35.                             {
  36.                                 if (publish)
  37.                                 {
  38.                                     // Publishing
  39.                                     ContentTypeHelper.ContentTypePublish(site, ctype);
  40.                                 }
  41.                                 else
  42.                                 {
  43.                                     // Unpublishing
  44.                                     ContentTypeHelper.ContentTypeUnPublish(site, ctype);
  45.                                 }
  46.                             }
  47.                         }
  48.                     }
  49.                 }
  50.             }
  51.             catch (Exception ex)
  52.             {
  53.                 Console.WriteLine(ex.ToString());
  54.             }
  55.         }
  56.     }
  57. }

Note: Be aware of the utilisation of the namespace Microsoft.SharePoint.Taxonomy, which refers to the assembly Microsoft.SharePoint.Taxonomy.dll, which is only available in SharePoint Server 2010 (directory 14\ISAPI).

I have also created some libraries to facilitate the publishing, as you can see it in the solution below:
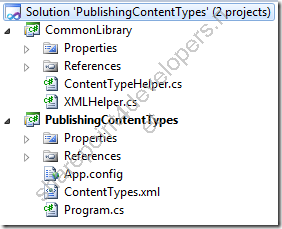
 script
Figure 10 – Content Types Publishing Solution

The code below refers to the class ContentTypeHelper.cs and shows the details for publishing and unpublishing Content Types:

Code Snippet
  1. using System;
  2. using System.Collections.Generic;
  3. using System.Linq;
  4. using System.Text;
  5. using Microsoft.SharePoint;
  6. using Microsoft.SharePoint.Taxonomy;
  7. using Microsoft.SharePoint.Taxonomy.ContentTypeSync;
  8.  
  9. namespace CommonLibrary
  10. {
  11.     public static class ContentTypeHelper
  12.     {
  13.         public static void ContentTypePublish(SPSite hubSite, SPContentType ctype)
  14.         {
  15.             // Check to see whether the site is a valid hub site.
  16.             if (ContentTypePublisher.IsContentTypeSharingEnabled(hubSite))
  17.             {
  18.                 ContentTypePublisher publisher = new ContentTypePublisher(hubSite);
  19.  
  20.                 Console.WriteLine("Publishing the content type: " + ctype.Name);
  21.  
  22.                 // Check to see whether this content type has been published.
  23.                 if (publisher.IsPublished(ctype))
  24.                 {
  25.                     Console.WriteLine(ctype.Name + " is a published content type.");
  26.                 }
  27.  
  28.                 publisher.Publish(ctype);
  29.             }
  30.             else
  31.             {
  32.                 // The provided site is not a valid hub site.
  33.                 Console.WriteLine("This site is not a valid hub site");
  34.             }
  35.         }
  36.  
  37.         public static void ContentTypeUnPublish(SPSite hubSite, SPContentType ctype)
  38.         {
  39.             if (ContentTypePublisher.IsContentTypeSharingEnabled(hubSite))
  40.             {
  41.                 ContentTypePublisher publisher = new ContentTypePublisher(hubSite);
  42.  
  43.                 Console.WriteLine("Unpublishing the content type: " + ctype.Name);
  44.  
  45.                 // Check to see whether this content type has been published.
  46.                 if (!publisher.IsPublished(ctype))
  47.                 {
  48.                     Console.WriteLine(ctype.Name + " is not a published content type.");
  49.                 }
  50.                 else
  51.                 {
  52.                     publisher.Unpublish(ctype);
  53.                 }
  54.             }
  55.             else
  56.             {
  57.                 // The provided site is not a valid hub site.
  58.                 Console.WriteLine("This site is not a valid hub site");
  59.             }
  60.         }
  61.     }
  62. }

Download the solution here.

How to consume Content Types

In order to consume the Content Types of the Content Type Hub, make sure you are referencing the Metadata Service Application that offers the service application. This applies only if you are using another Web Application as Hub, otherwise you're already entitled to use it within your Web Application.

Make sure you have referenced the service application in the Central Administration > Application Management > Configure service application associations. The Figure 11 displays the scenario that I have just commented:
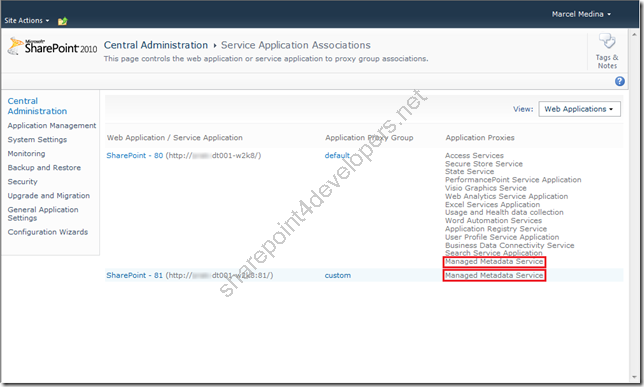
 association
Figure 11 – Configuring the service application association

Note: Notice that I have two Web Applications, the 81 serves as Publisher and the 80 as Subscriber. Both use the same service Managed Metadata Service.

In the beginning of this article I quickly commented on the Timer Jobs that are responsible for the Content Types Synchronism, now just exploring a little more, if you want to trigger them after publishing or unpublishing Content Types for a quick check, go to the Central Administration > Monitoring > Check job status and select the desired job definition according the Figures 12 and 13:
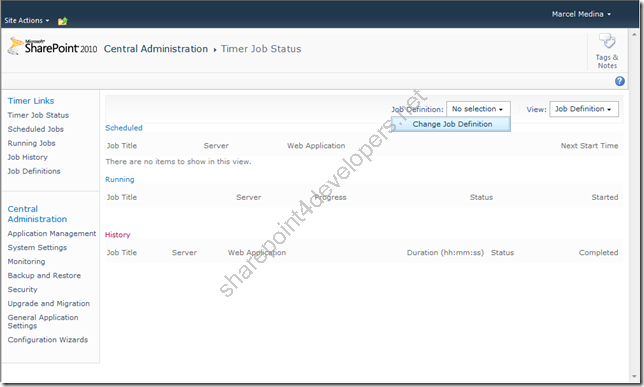
 jobdefinition
Figure 12 – Triggering Timer Jobs (1/2)
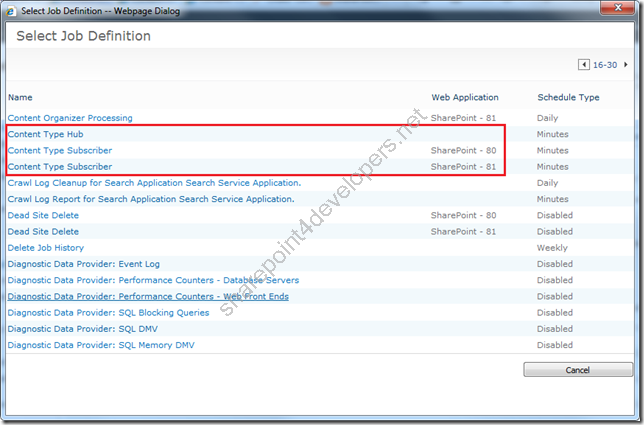
 jobdefinition2
Figure 13 – Triggering Timer Jobs (2/2)

Note: By forcing the execution of the Timer Jobs above, always trigger the Content Type Hub (Publisher) first and then the Subscribers. The execution is asynchronous, so despite the status changes quickly after triggering the job, probably it will still be running.

Note that there are two Subscribers consuming the Content Types (port 80 and 81) even though the Hub is on port 81, just because other Site Collections within the same Web Application can take advantage of Content Types.

After the asynchronous execution, you have the option to check at the Site Collection Subscribers whether the Content Types were successfully replicated. One possible way is to access the Content Types via Site Actions> Site Settings> Site content types (Group Galleries) and check whether the Content Type is there, according Figure 14:
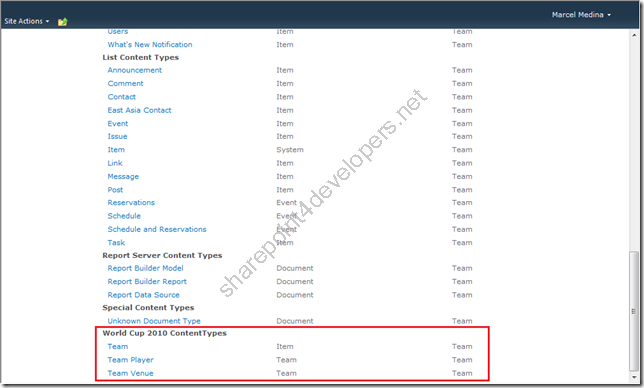
 happyend
Figure 14 – Content Types published :)

Another possible way is exemplified in the section “Troubleshooting” below.

Troubleshooting

Nothing is perfect, you will always face problems that appear in the middle of the road. Welcome to the Real World!

In order to check the publishing errors there are two ways, both can be checked at the Publisher or at the Subscriber sides, the first way is available on the Hub Site in Site Actions> Site Settings> Content type service application error log (Site Collection Administration group) according Figure 15 below:
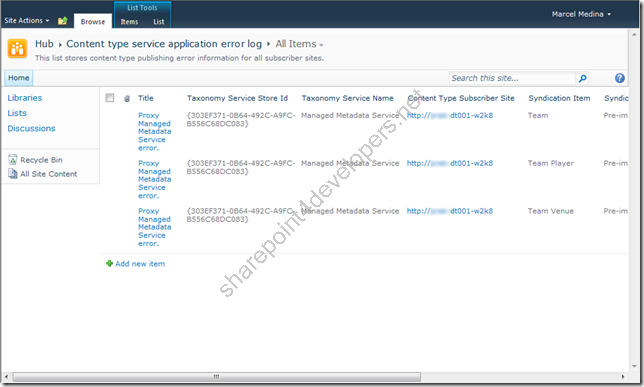
 errorpublisher
Figure 15 – Checking the publishing errors at the Publisher side

The second way is available at the Site Collections Subscribers side in Site Actions > Site Settings > Content Type Publishing (Site Collection Administration group) according Figure 16:
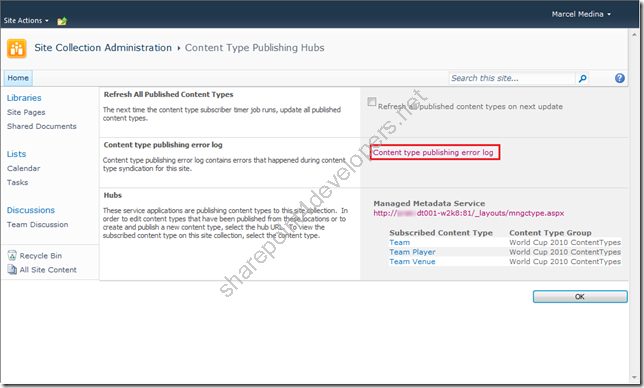
errorsubscriber1
Figure 16 – Checking the publishing errors at the Subscriber side (1/2)

NOTE: The figure above shows a successful outcome, because all the Content Types were published correctly (what should happen in your environment). This figure is only used to display where to find the possible publishing errors.

Another point to be reviewed is regarding the Refresh of all the Content Types published. If you wish to force an update of the Subscriber, which has changed for some reason, leave this option selected. This will overwrite the current Content Types with the version of the Publisher.

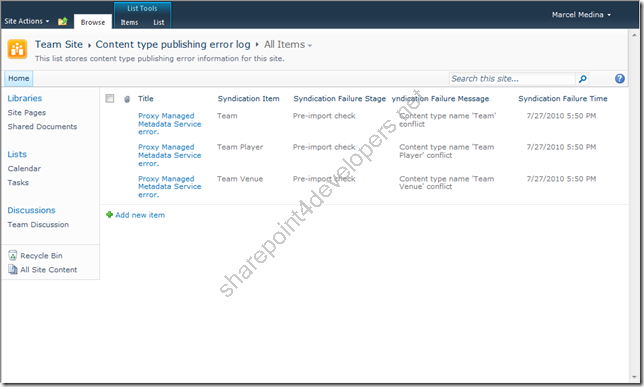
Visit the link for the publishing error log, there you can also see the publishing errors (the same as the Publisher) as shown in Figure 17:
 errorsubscriber2
Figure 17 – Checking the publishing errors at the Subscriber side (2/2)

Tip of the day

***UPDATED in 29/08/2011***
Features can be used to deploy content types in the Hub. They are always the best practice. Just be aware that this will create a dependency on them with a FeatureId, and by doing this, when you publish the content types, the same Feature on the Site Collections Subscribers will be required, so you can get the content types published.

Other option is to use a Powershell script or Console Application. In this case, when you publish the content types, there is no need to activate any feature in the Site Collections Subscribers.

I hope it clarifies the options you have when deploying and publishing content types. :)

Conclusion

In the version of SharePoint Server 2010, the Service Metadata Application enables the sharing of Content Types, which promotes the Content Type Syndication in different Site Collections from different Web Applications, and even in different Farms!

Enjoy this feature to create a new Design sharing Content Types!

References:
http://www.wictorwilen.se/Post/Plan-your-SharePoint-2010-Content-Type-Hub-carefully.aspx
http://www.chakkaradeep.com/post/SharePoint-2010-Content-Type-Hubs
http://msdn.microsoft.com/en-us/library/ff394469.aspx
http://technet.microsoft.com/en-us/library/ee424403.aspx
http://technet.microsoft.com/en-us/library/ee519603.aspx


Cheers,

Marcel Medina

Click here to read the same content in Portuguese.