Hi folks,
I have found interesting things in SharePoint Server 2010 after the MOSS 2007 migration project I have worked on recently. Check this out, can you identify the difference between Figures 1 and 2 below?
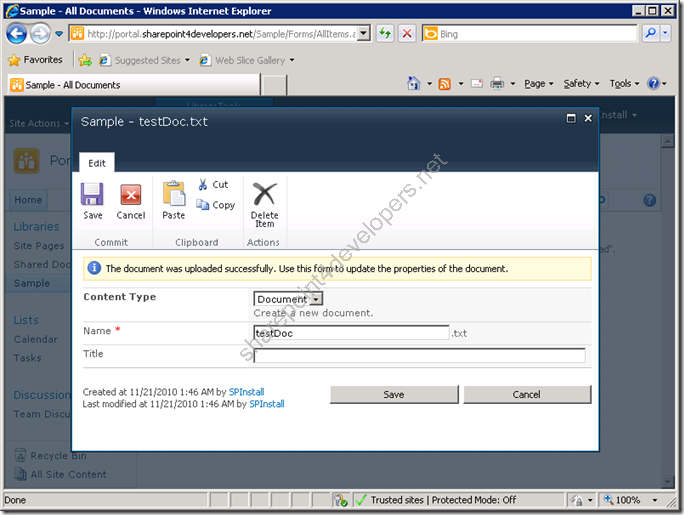
Figure 1 - Document Content Type
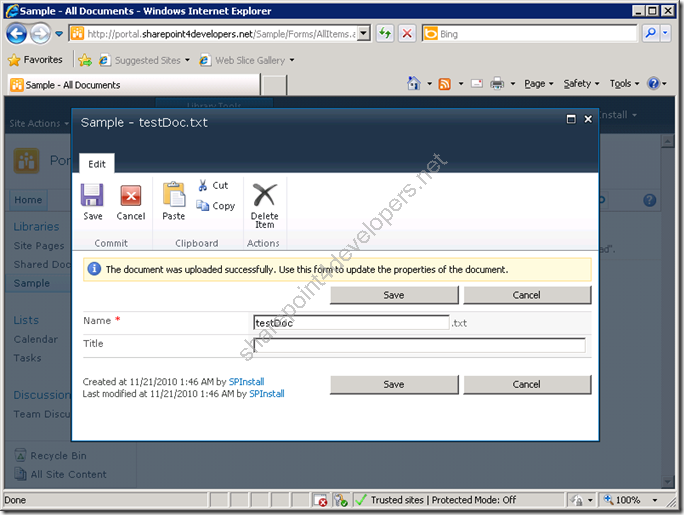
Figure 2 - Report Content Type
It seems obvious isn't it? Save and Cancel buttons are more evident, but the main difference that affects users is the content type choice field.
In the Figures 1 and 2 the content types Document and Report were used. Each one refers to a different Form Template.
Note: For comparative purposes I have excluded the other Report columns not displayed in Figure 2.
What to do if you need to make the Content Type Choice Field available (Figure 1)? I'll show you some approaches to change that.
Approach 1 - SharePoint Manager 2010
This tool is great because it facilitates the work, helping you to the rapid update of SharePoint objects. If you are a SharePointer, you should know it!
When using this tool any update is very simple to be applied, which is displayed in the Figure 3 for the update of the Form Template:
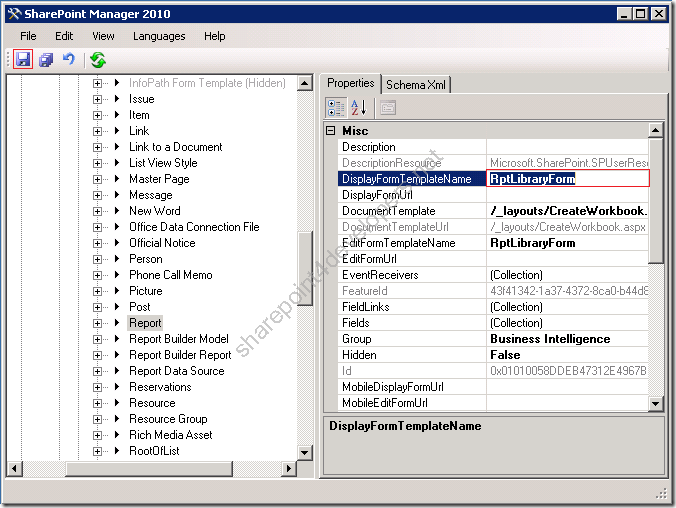
Figure 3 - Updating the Form Template
The Form Template called RptLibraryForm is responsible for not displaying the content type choice field (Figure 2). As per Figure 3, the solution would be to update the attributes DisplayFormTemplateName, EditFormTemplateName and NewFormTemplateName to another form template, i.e.: DocumentLibraryForm (which is the same as shown in Figure 1).
Form templates are found in content types and they can be changed in two places: the root site collection or document libraries. This type of change would be recommended only for direct change in document libraries, because I do not recommend changing the base object of a root site collection. Any mistake at this level and will affect the site and sub-sites!
When things get complicated a more sustainable solution comes true, which involves the development of form templates.
Approach 2 – Script
A script can be created by using Visual Studio with the creation of a Console Application or via PowerShell.
Regardless of the way it will be executed, the result is the same as the use of SharePoint Manager 2010, but will be done via script.
The code below was developed to run via Console Application:
Code Snippet
- static void Main(string[] args)
- {
- using (SPSite site = new SPSite("http://portal.sharepoint4developers.net"))
- {
- using (SPWeb web = site.RootWeb)
- {
- // Get the library
- SPDocumentLibrary library = web.Lists["Sample"] as SPDocumentLibrary;
-
- // Change the form template
- library.ContentTypes["Report"].DisplayFormTemplateName = "CustomLibraryForm";
- library.ContentTypes["Report"].EditFormTemplateName = "CustomLibraryForm";
- library.ContentTypes["Report"].NewFormTemplateName = "CustomLibraryForm";
-
- // Update the content type
- library.ContentTypes["Report"].Update();
- }
- }
- }
NOTE: The code above is updates a Document Library Content Type.
This is the Powershell script that matches the Console Application:
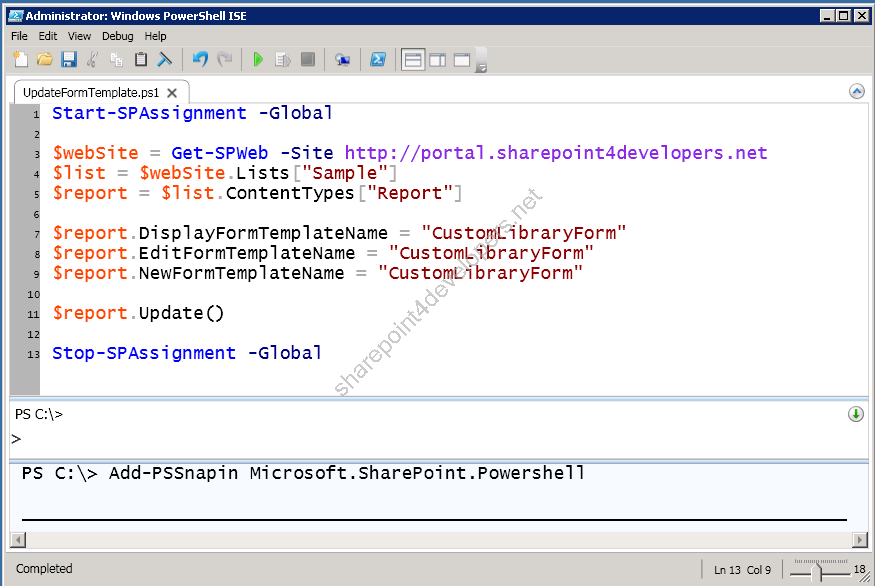
Figure 4 – Powershell script
Download the script here.
Approach 3 - Development of Form Templates
A safe solution is the development of features in SharePoint, because the generated packages can be easily added and activated. Likewise when not in use, disabled and removed.
I recommend sustainable approaches, as they will run smoothly and will not bring you headaches in the future.
Create a new solution in Visual Studio 2010 and name it CustomLibraryFormSolution, as shown in Figure 5:
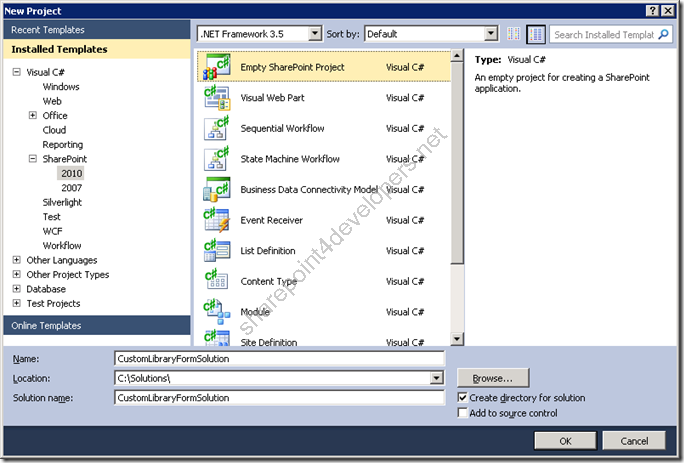
Figure 5 – New Solution
Define the solution as a Farm Solution, validate it and wait for its creation by the Wizard, as per Figure 6:
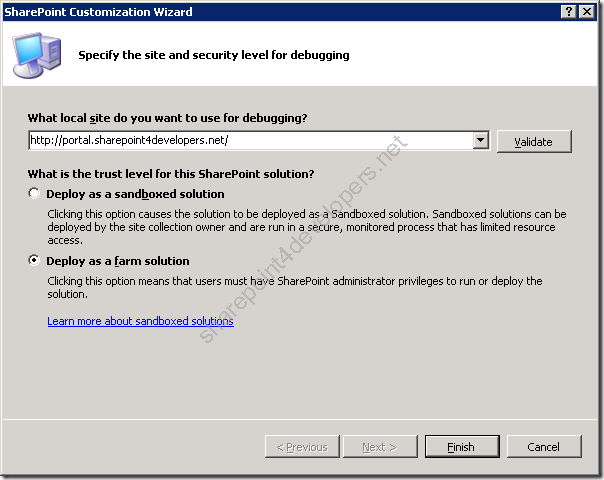
Figure 6 – Wizard
After creating the project a User Control and Feature needs to be created for deployment.
Creating the User Control CustomLibraryForm
This User Control represents a new form template that will be created. To begin add the SharePoint Mapped Folder 14\TEMPLATE\CONTROLTEMPLATES in your project, as displayed in the Figure 7:
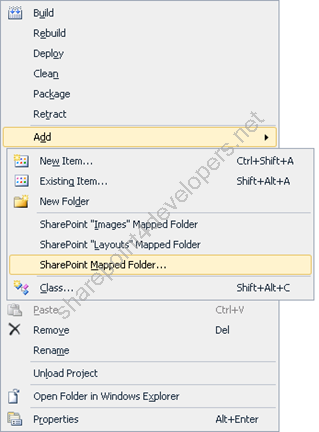
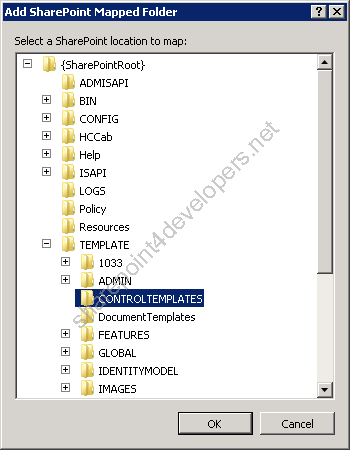
Figure 7 – SharePoint Mapped Folder
Note: SharePoint Mapped Folders help a lot. They deploy any file automatically and in the correct place.
Then add a new User Control in this mapped folder and name it CustomLibraryForm, as per Figure 8:
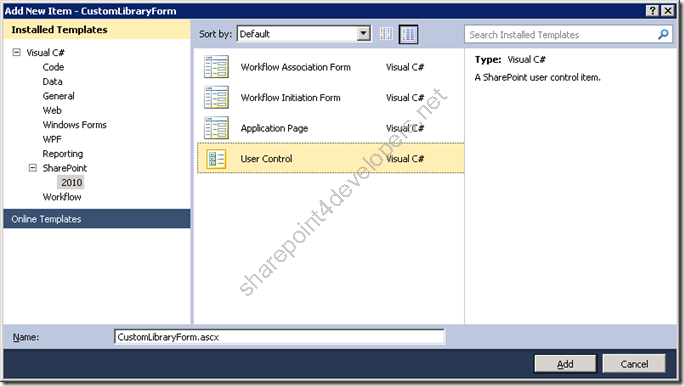
Figure 8 – User Control that holds the Form Template
NOTE: If you open the folder 14\TEMPLATE\CONTROLTEMPLATES you can see that it contains several User Controls. The main form templates in use are concentrated in the file DefaultTemplates.ascx.
Delete the files .cs and leave only the .ascx available. Open the User Control, delete all the content and add the code below:
Code Snippet
- <%@ Control Language="C#"AutoEventWireup="false" %>
- <%@Assembly Name="Microsoft.SharePoint, Version=14.0.0.0, Culture=neutral, PublicKeyToken=71e9bce111e9429c" %>
- <%@Register TagPrefix="SharePoint" Assembly="Microsoft.SharePoint, Version=14.0.0.0, Culture=neutral, PublicKeyToken=71e9bce111e9429c" namespace="Microsoft.SharePoint.WebControls"%>
- <%@Register TagPrefix="ApplicationPages" Assembly="Microsoft.SharePoint, Version=14.0.0.0, Culture=neutral, PublicKeyToken=71e9bce111e9429c" namespace="Microsoft.SharePoint.ApplicationPages.WebControls"%>
- <%@Register TagPrefix="SPHttpUtility" Assembly="Microsoft.SharePoint, Version=14.0.0.0, Culture=neutral, PublicKeyToken=71e9bce111e9429c" namespace="Microsoft.SharePoint.Utilities"%>
- <%@ Register TagPrefix="wssuc" TagName="ToolBar" src="~/_controltemplates/ToolBar.ascx" %>
- <%@ Register TagPrefix="wssuc" TagName="ToolBarButton" src="~/_controltemplates/ToolBarButton.ascx" %>
-
- <SharePoint:RenderingTemplate id="CustomLibraryFormCore" runat="server">
- <Template>
- <table class="ms-formtable" style="margin-top: 8px;" border="0" cellpadding="0" id="formTbl" cellspacing="0" width="100%">
- <SharePoint:ChangeContentType runat="server"/>
- <SharePoint:DocumentLibraryFields runat="server"/>
- <SharePoint:ApprovalStatus runat="server"/>
- </table>
- <SharePoint:WebPartPageMaintenanceMessage runat="server"/>
- <SharePoint:DocumentTransformersInfo runat="server"/>
- <table cellpadding="0" cellspacing="0" width="100%"><tr><td class="ms-formline"><img src="/_layouts/images/blank.gif" width='1' height='1' alt="" /></td></tr></table>
- <table cellpadding="0" cellspacing="0" width="100%" style="padding-top: 7px"><tr><td width="100%">
- <SharePoint:ItemHiddenVersion runat="server"/>
- <SharePoint:InitContentType runat="server"/>
- <wssuc:ToolBar CssClass="ms-formtoolbar" id="toolBarTbl" RightButtonSeparator="&#160;" runat="server">
- <Template_Buttons>
- <SharePoint:CreatedModifiedInfo runat="server"/>
- </Template_Buttons>
- <Template_RightButtons>
- <SharePoint:SaveButton runat="server"/>
- <SharePoint:GoBackButton runat="server"/>
- </Template_RightButtons>
- </wssuc:ToolBar>
- </td></tr></table>
- </Template>
- </SharePoint:RenderingTemplate>
-
- <SharePoint:RenderingTemplate id="CustomLibraryForm" runat="server">
- <Template>
- <SharePoint:InformationBar runat="server"/>
- <wssuc:ToolBar CssClass="ms-formtoolbar" id="toolBarTbltop" RightButtonSeparator="&#160;" runat="server">
- <Template_RightButtons>
- <SharePoint:SaveButton runat="server"/>
- <SharePoint:GoBackButton runat="server"/>
- </Template_RightButtons>
- </wssuc:ToolBar>
- <SharePoint:FormToolBar runat="server"/>
- <SharePoint:FormComponent TemplateName="CustomLibraryFormCore" runat="server"/>
- </Template>
- </SharePoint:RenderingTemplate>
NOTE: The code above was extracted from the User Control RptLibTemplate.ascx. Line 12 was the only line added that includes the Content Type Choice field.
Creating the Custom Report Feature
This feature will be responsible for the deployment of a Content Type which uses the new Form Template created. To begin add a new content type and name it CustomReport, as per Figure 9:
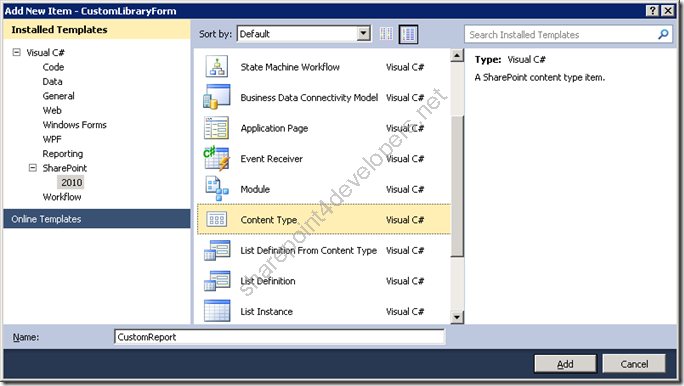
Figura 9 – New Content Type
The Wizard will appear according to the Figure 10, then select the base content type in which the new content type will inherit from.
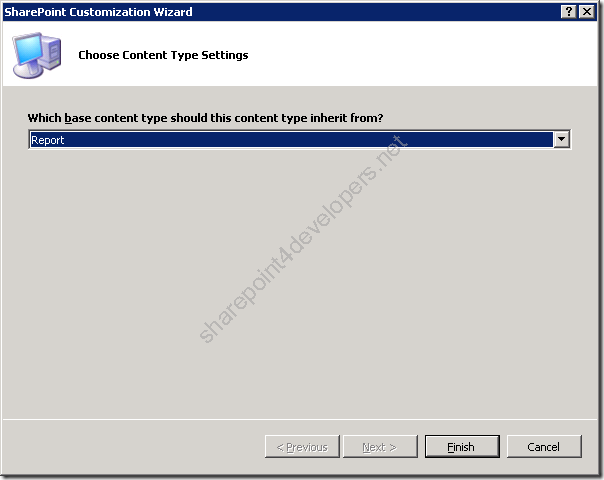
Figure 10 – Wizard
After its creation the Content Type XML definition is automatically displayed, modify it according to the code below:
Code Snippet
- <?xml version="1.0" encoding="utf-8"?>
- <Elements xmlns="http://schemas.microsoft.com/sharepoint/">
- <!-- Parent ContentType: Report (0x01010058DDEB47312E4967BFC1576B96E8C3D4) -->
- <ContentType ID="0x01010058DDEB47312E4967BFC1576B96E8C3D4006440fbf80e1849a8bc00166a8703769d"
- Name="Custom Report"
- Group="Business Intelligence"
- Description="References a Custom Form Template"
- Inherits="FALSE"
- Version="0">
- <FieldRefs/>
- <XmlDocuments>
- <XmlDocument NamespaceURI="http://schemas.microsoft.com/sharepoint/v3/contenttype/forms">
- <FormTemplates xmlns="http://schemas.microsoft.com/sharepoint/v3/contenttype/forms">
- <Display>CustomLibraryForm</Display>
- <Edit>CustomLibraryForm</Edit>
- <New>CustomLibraryForm</New>
- </FormTemplates>
- </XmlDocument>
- </XmlDocuments>
- </ContentType>
- </Elements>
NOTE: Make sure that the line 8 is changed to Inherits = "FALSE", once it prevents the Form Template informed in the section XMLDocuments to be overwritten by inheritance. Interestingly even setting this attribute to false, the columns are automatically inherited. :)
A feature should be designed to deploy the content type. Add it on the project and set its attributes as shown in Figure 11:
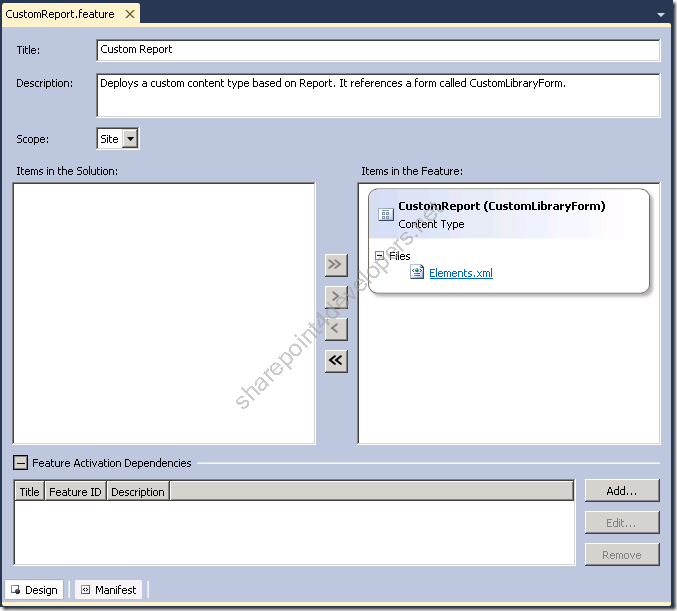
Figure 11 – Custom Report Feature Details
Before anything, make sure the checkbox Reset Web Server, which is available at the package properties, is checked. It assures that the User Control is identified immediately after the deployment, check out the Figure 12:
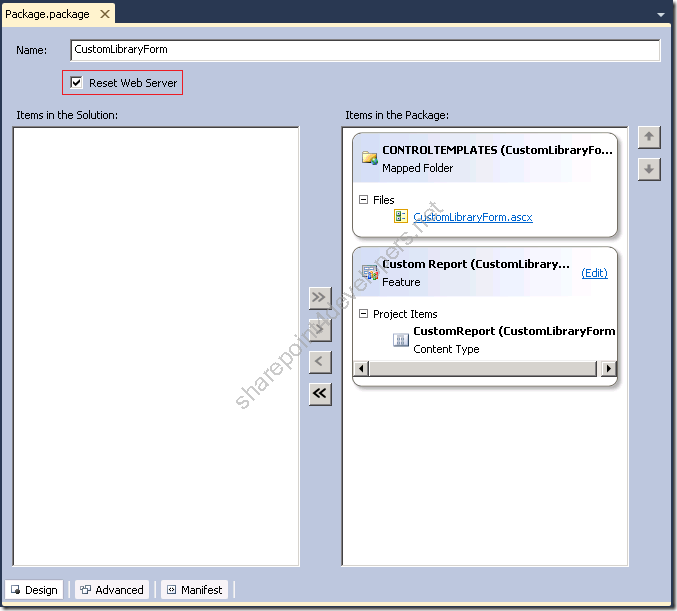
Figure 12 – Package details
NOTE: Download the solution here.
Custom Form Template
In the end, when the form template is created and deployed, according to the Figure 13 check the expected CustomLibraryForm:
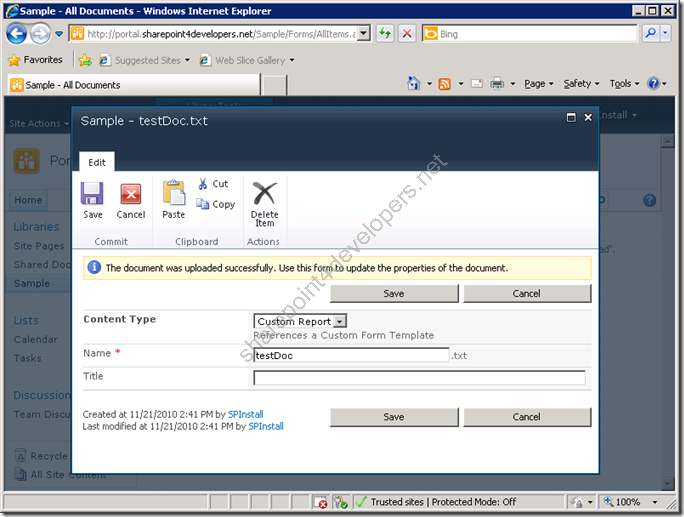
Figure 13 – Custom Form Template
NOTE: As you can see, this is the form RptLibraryForm with the addition of the Content Type Choice field.
The three approaches used work very well. As already said, always use best practices and create sustainable solutions.
Unlike the creation of features, scripts are developed faster, although in this case it is a temporary solution. I say this because in the future something can "break" according to the script run (with or without documentation).
I hope it helps.
References:
http://msdn.microsoft.com/en-us/library/aa544142.aspx
http://msdn.microsoft.com/en-us/library/ms468437.aspx
http://msdn.microsoft.com/en-us/library/aa544154.aspx
Cheers
Marcel Medina


Click here to read the same content in Portuguese.