Hi folks,
This post is the continuation of the Business Connectivity Services Series, focused on development. In this approach I demonstrate how to create ECTs via Database.
External Data Access
For all the examples, consider using the following table Contact. It needs to be created, as this will be used as our base table for exemplification:
Code Snippet
- CREATE TABLE [dbo].[Contact](
- [ContactID] [int] IDENTITY(1,1) NOT NULL,
- [CompanyName] [nvarchar](100) NULL,
- [ContactName] [nvarchar](70) NOT NULL,
- [ContactTitle] [nvarchar](10) NULL,
- [Address] [nvarchar](100) NULL,
- [Email] [nvarchar](100) NOT NULL,
- [City] [nvarchar](15) NULL,
- [Region] [nvarchar](15) NULL,
- [PostalCode] [nvarchar](10) NULL,
- [Country] [nvarchar](15) NULL,
- [Phone] [nvarchar](24) NOT NULL,
- [Fax] [nvarchar](24) NULL,
-
- CONSTRAINT [PK_Contact] PRIMARY KEY (
- [ContactID] ASC
- )
- )
Create it against the SQL Server, because the ECTs are going to be created based on this table. The task of creating a table I am not going to approach, once this is not the purpose of this article (Please check the references for links to perform that).
Creating ECTs via Database
In order to create ECTs via database only SPD2010 is required and nothing more.
Use this type of approach in environments:
-
That are in the same network, where the database access can be done directly through SPD2010;
-
There is no need of creating business rules, just because CRUD operations are sufficient;
-
That uses SQL Server database (that´s right, only SQL Server);
If you have this scenario, this demonstration is the easiest and simplest way to implement.
Working with SharePoint Designer 2010
Start the SPD2010 (through SharePoint 2010 or open this tool directly) and access External Content Types in the Navigation pane. Create a new ECT and set the properties according the Figure 1:
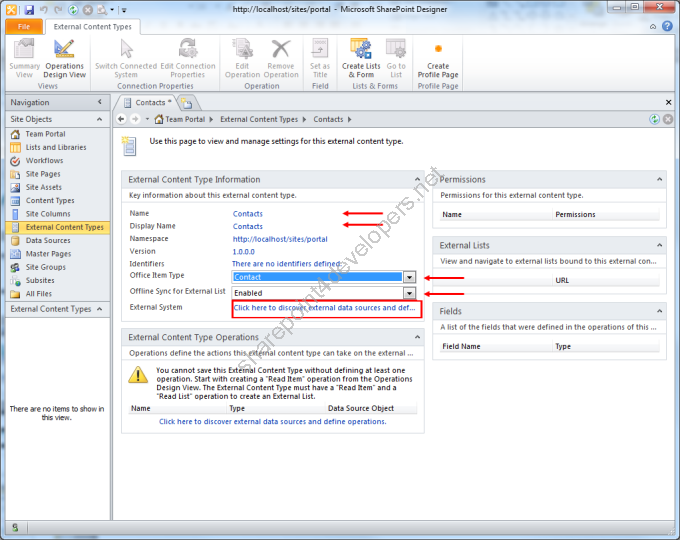 Figure 1 – Creating an ECT
Note: The properties Office Item Type and Offline Sync for External List determine the mapping type of objects in Office 2010 and if the sync option will be available for External Lists respectively. Pay attention to the selection areas in red colour that display the steps to perform the configuration, which can be enumerated to indicate the correct steps.
When clicking over the External System for mapping the ECT, the Figure 2 is displayed:
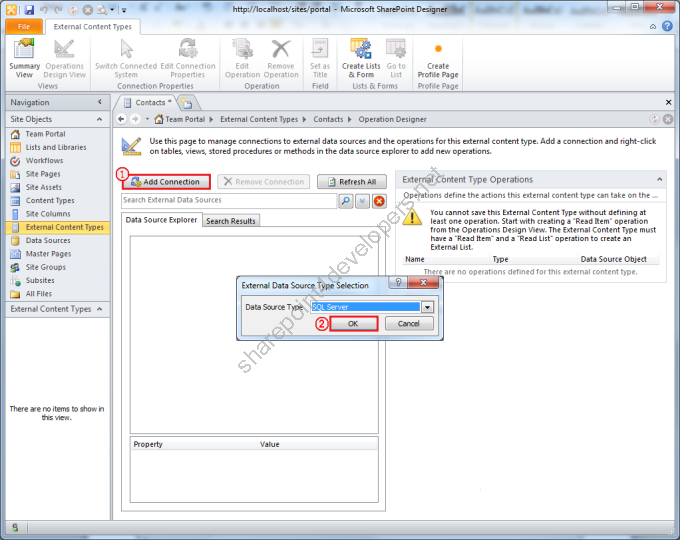 Figure 2 – Adding a new connection
Add a new connection (1) that maps the SQL Server database by selecting it in the External Data Source option (2). Set the connection parameters according the Figure 3:
 Figure 3 – Connection details
Nesse When connecting with User´s Identity, the SQL Server uses the login of the current user logged in SharePoint to display data. Proceed with the operation and find the table Contact. In order to create a CRUD, select the option from the context menu (right button) Create All Operations according the Figure 4:
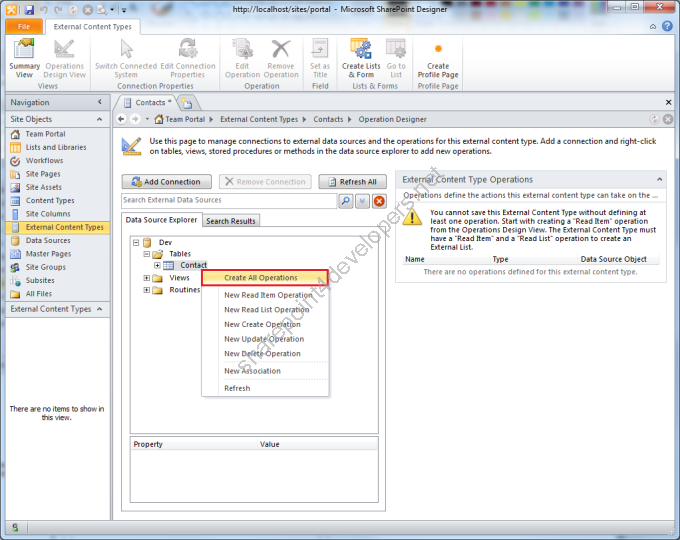 Figure 4 - Creating all the operations of a CRUD
Note: In this example we have a CRUD, which contains all the operations, but if you opt for the creation of some operations only, the operations Read Item and Read List needs to be created (at least). Otherwise you cannot create an External List, which represents a SharePoint list that displays external data.
A modal screen is displayed at the moment of picking out an operation. On this screen set the parameters of the CRUD, according the Figure 5:
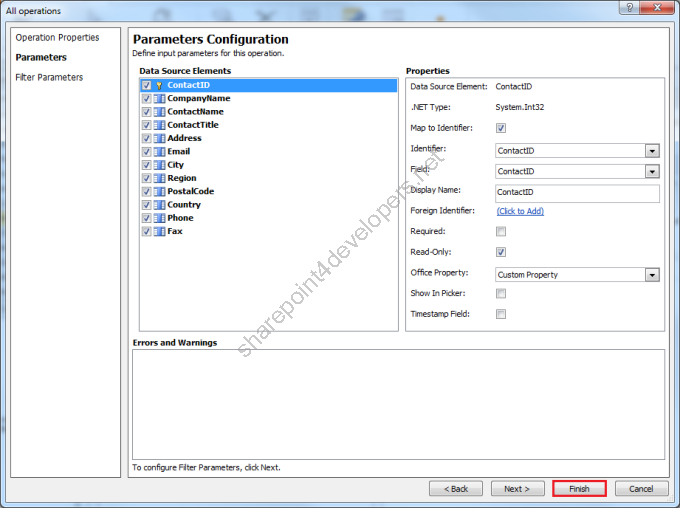 Figure 5 - Parameters configuration screen
Basically we need to configure the column properties of the table Contact, setting an identifier, display names, required fields and the mapping for the Office properties (Outlook). All the definitions are available in the Tables 1 and 2.
| Data Source Element | .NET Type | Map to Identifier | Identifier | Field | Display Name | Foreign Identifier |
| ContactID | System.Int32 | TRUE | ContactID | ContactID | ID | |
| CompanyName | System.String | FALSE | | CompanyName | Company Name | |
| ContactName | System.String | FALSE | | ContactName | Contact Name | |
| ContactTitle | System.String | FALSE | | ContactTitle | Contact Title | |
| Address | System.String | FALSE | | Address | Address | |
| Email | System.String | FALSE | | Email | E-mail | |
| City | System.String | FALSE | | City | City | |
| Region | System.String | FALSE | | Region | Region | |
| PostalCode | System.String | FALSE | | PostalCode | Postal Code | |
| Country | System.String | FALSE | | Country | Country | |
| Phone | System.String | FALSE | | Phone | Phone | |
| Fax | System.String | FALSE | | Fax | Fax | |
Table 1 – CRUD Parameters
| Data Source Element | Required | Read-Only | Office Property | Show In Picker | Timestamp Field |
| ContactID | FALSE | TRUE | Custom Property | FALSE | FALSE |
| CompanyName | FALSE | FALSE | Company Name (CompanyName) | FALSE | FALSE |
| ContactName | TRUE | FALSE | Full Name (FullName) | FALSE | FALSE |
| ContactTitle | FALSE | FALSE | Title (Title) | FALSE | FALSE |
| Address | FALSE | FALSE | Business Address (BusinessAddress) | FALSE | FALSE |
| Email | TRUE | FALSE | Email 1 Address (Email1Address) | FALSE | FALSE |
| City | FALSE | FALSE | Business Address City (BusinessAddressCity) | FALSE | FALSE |
| Region | FALSE | FALSE | Business Address State (BusinessAddressState) | FALSE | FALSE |
| PostalCode | FALSE | FALSE | Business Address Postal Code (BusinessAddressPostalCode) | FALSE | FALSE |
| Country | FALSE | FALSE | Business Address Country/Region (BusinessAddressCountry) | FALSE | FALSE |
| Phone | TRUE | FALSE | Business Telephone Number (BusinessTelephoneNumber) | FALSE | FALSE |
| Fax | FALSE | FALSE | Business Fax Number (BusinessFaxNumber) | FALSE | FALSE |
Table 2 – CRUD Parameters (Continuation) Note: Fields in gray colour have two meanings in Tables 1 and 2:
The field Data Source Element is the reference used in both tables.
Once all the column properties were set properly, save the ECT (1) and note the operations created (2), which can be edited at any time, according the Figure 6:
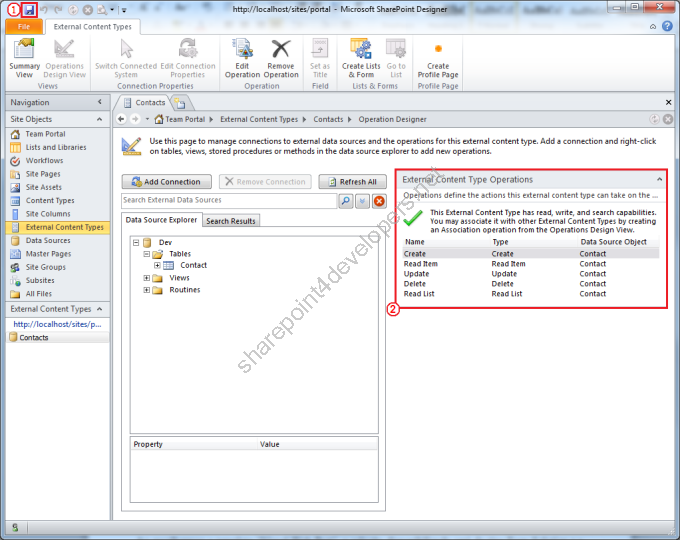 Figure 6 – Saving the ECT
At this moment it is already possible to create an External List that will display the external data in SharePoint 2010. In this same screen of External Content Types, select the option External List on the context menu. Name it to Contacts, according the Figure 7:
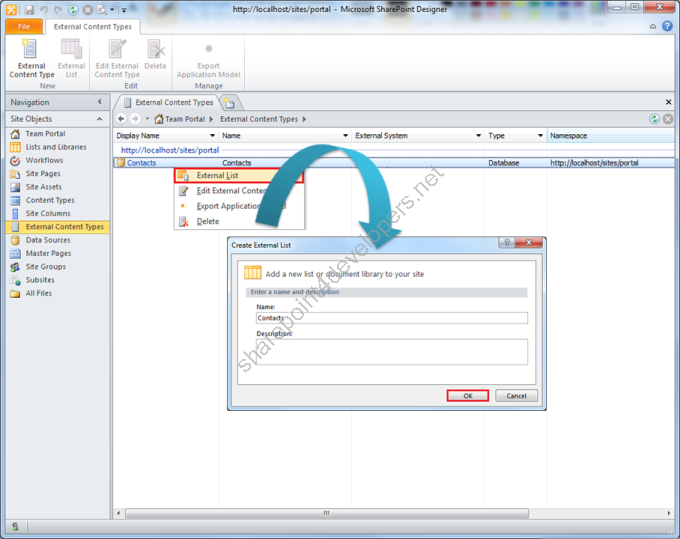 Figure 7 – Creating an External List
From this point on we only need to test the External List to see its functioning.
Testing an External List
This is the final step of creating ECTs, in which the CRUD operations are going to be tested against the External Lists. In order to do that, access the SharePoint Site where the External List Contacts was created.
Open it and add a new item. Note that the configuration of parameters were applied into the columns, according the Figure 8:
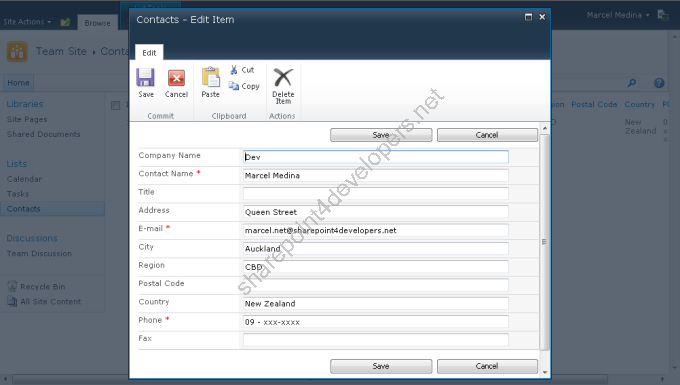 Figure 8 - Adding a new item on the Contacts List
Immediately after adding the new item, check whether it is available at your table in the database. There it is, right? This is the expected behaviour after adding a new item, furthermore, the other CRUD operations must be active in the List Contacts according the Figure 9:
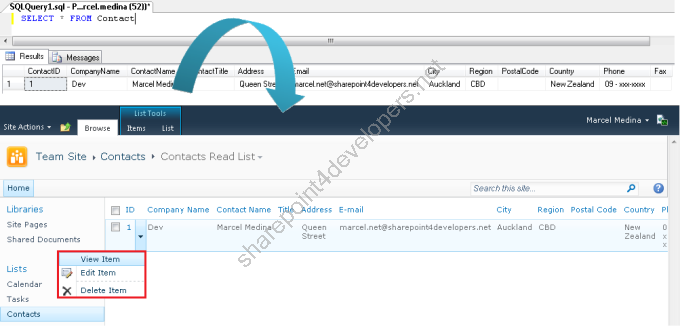 Figure 9 - Checking the CRUD operations
Perform the remaining operations and check against the database the expected behaviour.
In this post we explored the SharePoint Designer 2010 to create ECTs, however in the next posts of this series the Visual Studio 2010 will be utilised as additional tool. In the next post check how to create ECTs via Web Service. See you then!
References:
http://msdn.microsoft.com/en-us/library/ee556826(v=office.14).aspx
http://msdn.microsoft.com/en-us/library/ms186378(v=SQL.105).aspx
Cheers,
Marcel Medina


Click here to read the same content in Portuguese.