SharePoint 4 Developers

Additional reference guide in .NET / SharePoint Development

Lesson 2 – Content Types – Part II

The first step in creating content types is the choice of a built-in type. A built-in type identifies the source and how two content types are related. This post is a continuation of Lesson 2 - Content Types, in which I will explain Content Type IDs and show some examples about the creation of IDs.

Hi folks,

The first step in creating content types is the choice of a built-in type. A built-in type identifies the source and how two content types are related.

This post is a continuation of Lesson 2 - Content Types, in which I will explain Content Type IDs and show some examples about the creation of IDs.

For those who like to check in details how things work, I recommend this reading!

Content Type IDs

There are some rules to create IDs for content types with the use of XML files.

The first step in creating content types is to choose a built-in type, which are predefined types of content types. Figure 1 shows some examples:

1
Figure 1 - Examples of Built-in Content Types

Each built-in type has a unique identification, indicating which built-in type it inherited from and how they are related.

By analyzing the figure above, observe the hierarchical structure of the identification of built-in types. In blue colour we have the identifiers of inherited built-in types and, in black colour is the built-in type of which it was derived. This represents a tree structure of inheritance.

Built-in and Custom Content Type IDs

There are two ways of creating content type IDs:

  • Parent content type ID + 2 hexadecimal values
    NOTE: Designed to identify a base built-in content type

2
Figure 2 – Built-in Content Type ID

In the example above the selected block in red colour always changes, whose 2 hexadecimal values cannot be "00". The last blank block does not apply in this case.

  • Parent content type ID + "00" + hexadecimal GUID.
    NOTE: Designed to identify a custom content type.

3
Figure 3 – Custom Content Type ID

In the example above the block of Figure 2 remains at "00", and the selected block in red colour must receive a GUID.

Internally, the inheritance scheme is interpreted by SharePoint in blocks (Figures 2 and 3), which facilitates the identification of the ancestor of the content type.

Base Content Type Hierarchy

Both SharePoint 2007 and SharePoint 2010 Foundation have a base content type hierarchy, in which all the content types are derived. Consider the Figure 4:

4
Figure 4 – Base Content Type Hierarchy

As you can see, all content types inherit from System. This content type is the sealed type and can not be edited.

The content types that belong to the group _Hidden are not displayed in the User Interface. They are for internal use of SharePoint.

You can assign content types to list items, documents, and folders. Content types that inherit from the Document site content type can be assigned only to libraries. Similarly, you can assign content types that inherit from the Item site content type only to lists. Content types that inherit from the Folder content type template can be assigned to either libraries or lists, because both can contain folders.

Obtaining Base Content Type Hierarchy Programmatically

Through a recursive algorithm, that uses the LinkedList object to create the hierarchical tree, I simulate such reading.

This is a code for purposes of exemplification only, widely used in my trainings. The code consists of 3 classes:

Code Snippet
  1. using System;
  2. using System.Collections.Generic;
  3. using System.Linq;
  4. using System.Text;
  5. using Microsoft.SharePoint;
  6.  
  7. namespace BuiltinContentTypes
  8. {
  9.     class Program
  10.     {
  11.         static void Main(string[] args)
  12.         {
  13.             using (SPSite site = new SPSite("http://localhost/sites/team"))
  14.             {
  15.                 using (SPWeb web = site.RootWeb)
  16.                 {
  17.                     foreach (SPContentType ct in web.AvailableContentTypes)
  18.                     {
  19.                         Common.CreateContentTypeTree(web, ct.Id);
  20.                         Common.Level = 1;
  21.                     }
  22.                 }
  23.             }
  24.             Common.DisplayContentTypeTree();
  25.             Console.ReadLine();
  26.         }
  27.     }
  28. }

Class Program - Responsible for the execution of code


Code Snippet
  1. using System;
  2. using System.Collections.Generic;
  3. using System.Linq;
  4. using System.Text;
  5. using Microsoft.SharePoint;
  6.  
  7. namespace BuiltinContentTypes
  8. {
  9.     class ContentMapping : IEqualityComparer<ContentMapping>
  10.     {
  11.         #region Properties
  12.  
  13.         public string Name { get; set; }
  14.         public SPContentTypeId Id { get; set; }
  15.         public int Level { get; set; }
  16.  
  17.         #endregion
  18.  
  19.         #region IEqualityComparer<ContentMapping> Members
  20.  
  21.         public bool Equals(ContentMapping x, ContentMapping y)
  22.         {
  23.             return x.Id == y.Id;
  24.         }
  25.  
  26.         public int GetHashCode(ContentMapping obj)
  27.         {
  28.             return obj.GetHashCode();
  29.         }
  30.  
  31.         #endregion
  32.     }
  33. }

Class ContentMapping - Responsible for storing data of content types


Code Snippet
  1. using System;
  2. using System.Collections.Generic;
  3. using System.Linq;
  4. using System.Text;
  5. using Microsoft.SharePoint;
  6.  
  7. namespace BuiltinContentTypes
  8. {
  9.     class Common
  10.     {
  11.         #region Variables
  12.  
  13.         static int level = 1;
  14.         static LinkedList<ContentMapping> mapping = new LinkedList<ContentMapping>();
  15.         static ContentMapping content = null;
  16.  
  17.         #endregion
  18.  
  19.         #region Properties
  20.  
  21.         public static int Level
  22.         {
  23.             get { return level; }
  24.             set { level = value; }
  25.         }
  26.  
  27.         #endregion
  28.  
  29.         #region Methods
  30.  
  31.         /// <summary>
  32.         /// Creates a ContentMapping tree
  33.         /// </summary>
  34.         /// <param name="web">Sharepoint web</param>
  35.         /// <param name="ctId">ContentTypeId</param>
  36.         public static void CreateContentTypeTree(SPWeb web, SPContentTypeId ctId)
  37.         {
  38.             var contentType = web.AvailableContentTypes[ctId];
  39.  
  40.             // recursive
  41.             if (ctId.ToString() != "0x") CreateContentTypeTree(web, contentType.Parent.Id);
  42.  
  43.             if (level == 1)
  44.             {
  45.                 var cm = new ContentMapping() { Id = ctId, Name = contentType.Name, Level = level };
  46.                 if (mapping.Count == 0)
  47.                 {
  48.                     mapping.AddFirst(cm);
  49.                     content = cm;
  50.                 }
  51.             }
  52.             else
  53.             {
  54.                 var cm = new ContentMapping() { Id = ctId, Name = contentType.Name, Level = level };
  55.                 if (!mapping.Contains(cm, cm))
  56.                 {
  57.                     mapping.AddAfter(mapping.Find(content), cm);
  58.                     content = cm;
  59.                 }
  60.             }
  61.             level++;
  62.         }
  63.  
  64.         /// <summary>
  65.         /// Displays the tree
  66.         /// </summary>
  67.         public static void DisplayContentTypeTree()
  68.         {
  69.             StringBuilder tab = new StringBuilder();
  70.  
  71.             foreach (var item in mapping)
  72.             {
  73.                 tab.Remove(0, tab.Length);
  74.                 for (int i = 0; i < item.Level; i++)
  75.                     tab.Append("   ");
  76.                 if (item.Id.ToString().Length < 15) // just getting base built-in types
  77.                     Console.WriteLine(tab.ToString() + item.Id + " - " + item.Name);
  78.             }
  79.         }
  80.  
  81.         #endregion
  82.     }
  83. }

Common Class - Helper class that provides methods for construction of the tree

Download the code here.

At the end of execution, the content displayed on the console must be the same in Figure 4 (if you did not change any content type).

5
Figure 5 – Console of base content type hierarchy

Finally we can reproduce the image in Figure 4 with some additional built-in types that are not contained in the documentation of SharePoint 2010 (probably because the current documentation is preliminary and subject to change).

Well folks, that's it.

References:
http://msdn.microsoft.com/en-us/library/ms452896.aspx
http://msdn.microsoft.com/en-us/library/ms452896(office.14).aspx
http://msdn.microsoft.com/en-us/library/aa543822.aspx
http://msdn.microsoft.com/en-us/library/aa543822(office.14).aspx
Book: Professional SharePoint 2007 Development (WROX)

Cheers,

Marcel Medina

Lesson 2 – Content Types – Part I

What are Content Types? This concept is present in WSS 3.0 and remains present in SharePoint 2010 Foundation.

Hi folks,

The SharePoint Lessons Series is back with a very interesting issue for analysts and developers: Content Types.

What are Content Types? This concept is present in WSS 3.0 and remains present in SharePoint 2010 Foundation.

In this post I will present how to create content types, from analysis to development!

Enjoy one more post of the SharePoint Lessons Series!

What are Content Types?

Content Types are collections of metadata (encapsulate a data schema) that can be applied to a particular content such as lists and libraries, enabling you to manage its settings and behaviours in a centralized way.

A metadata is a data that defines other data, it works as an identifier. For example, the version number of an item is an example of metadata because it identifies the data.

Taxonomy

The identification of metadata depends on the classification and categorization of the object in question. This classification is called Taxonomy.

Just for understanding of how the classification and categorization of data works, consider 2 types of documents to be used here for example: job application and work contract.

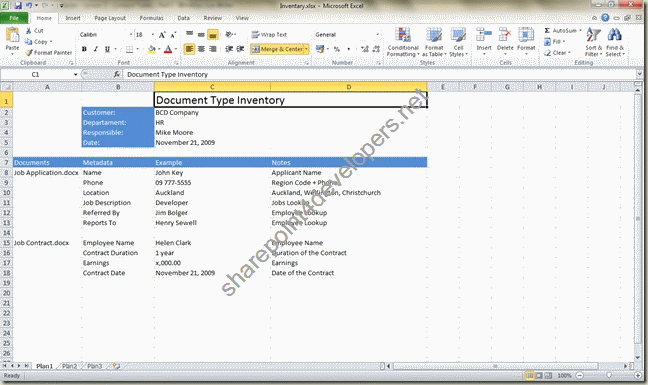
Each metadata must be extracted and documented for the creation of content types. In this case I show how to do it with Job Application and Job Contract, as Figure 1.
1
Figure 1 - Sample Document Inventory Spreadsheet

The spreadsheet above shows the metadata extracted from the fictitious documents JobAplication.docx and JobContract.docx.

Once classified and categorized, the two content types Job Application and Job Contract may be applied to lists and libraries.

In a technical point of view both content types can be applied to the same library, because multiple content types can be stored in the same list or library, but in a business model perspective this may not necessarily be an ideal thing.

Creating Content Types

The Content Types can be created in 3 ways:

  • By the User Interface
  • Using the API (object model)
  • By installing content types features based on XML definition files.

Now check out the creation of the Content Type of Job Contract in 3 different ways.

How to Create a Content Type by the User Interface

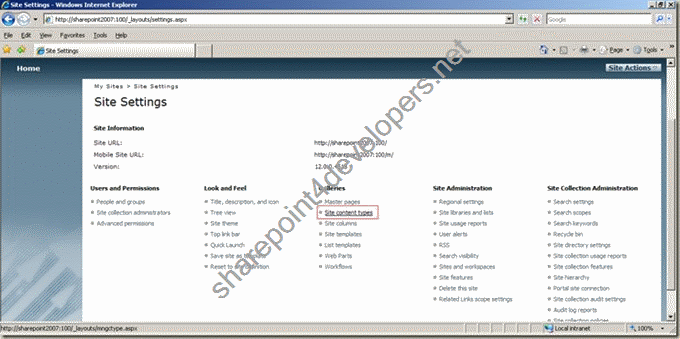
Click Site Actions> Site Settings and click on Site Content Types (group Galleries).
2
Figure 2 – Site Content Types

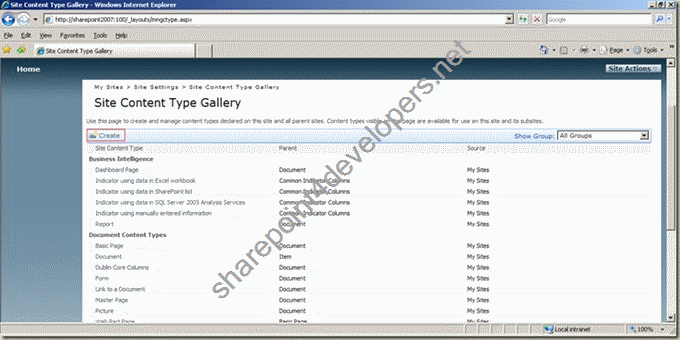
Click Create to add a new Content Type.
3
Figure 3 - Create a Content Type

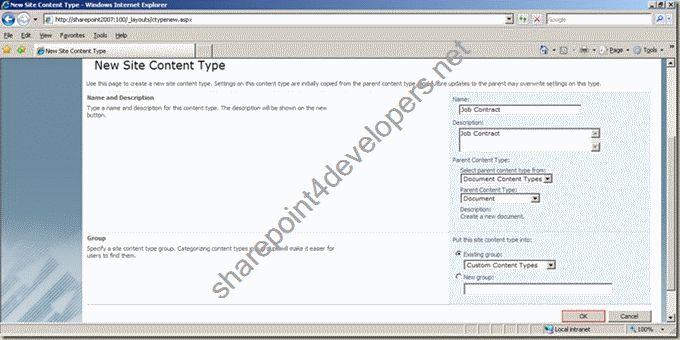
Please fill out the new content type according to Figure 4 and click OK.
4
Figure 4 - New Content Type

In the next part of my post I will show how the hierarchy of the types of Content Types.

After creating the Content Type Job Contract, it is necessary to add site columns that will be part of the collection of metadata.
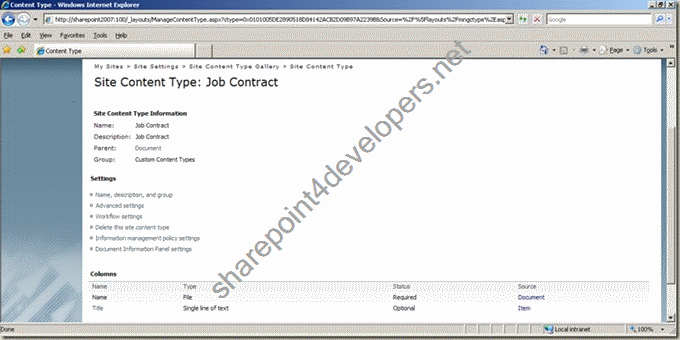
5
Figure 5 - Content Type Job Contract

Add new columns according table 1 settings. Click Add from new site column.

6
Figure 6 – Adding new site column

Column

Description

Employee Name

Column Name: Employee Name
Field Type: Single line of text
Description: Employee Name

Contract Duration

Column Name: Contract Duration
Field Type: Single line of text
Description: Duration of the Contract

Earnings

Column Name: Earnings
Field Type: Currency ($, ¥, €)
Minimum Value (Min): 0
Number of decimal places: 2
Description: Earnings

Contract Date

Column Name: Contract Date
Field Type: Date and Time
Description: Date of the Contract

Table 1 – Site Columns definition

Leave the default settings for the settings omitted. In case of doubt of how to create Site Columns, check out my other post about it.

After creating the site columns, the content type is available and configured as shown in Figure 7.
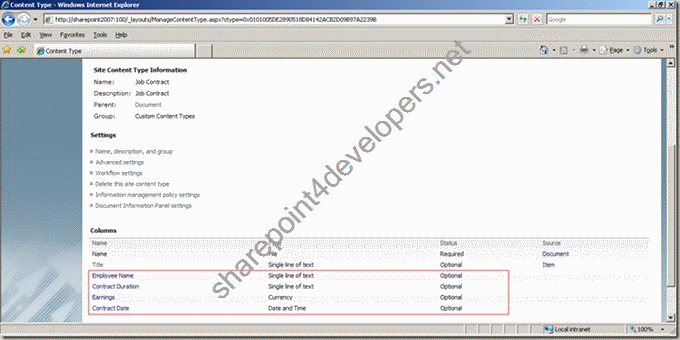
7
Figure 7 - Content Type Settings

How to Create a Content Type using the API (object model)

Firstly I will show the final solution and describe the code contained in the solution. I believe this is the easiest way of understanding.

The code created by me is available for download and modification for any reader of my blog.

Note the 2 files in the solution and Program.cs SiteSettings.cs:
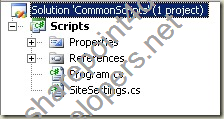
8
Figure 8 - Solution with project Scripts

The SiteSettings class is responsible for creating the SiteColumns described in Table 1 and the Content Type Job Contract.

Below is the code of SiteSettings class:

Code Snippet
  1. //------------------------------------------------------------------------
  2. // Author: Marcel Medina
  3. // Blog: http://www.sharepoint4developers.net
  4. //
  5. // Feel free to use this code any way you want
  6. // If this code helped you, leave a comment on the blog!
  7. //-------------------------------------------------------------------------
  8.  
  9. using System;
  10. using System.Collections.Generic;
  11. using System.Text;
  12. using Microsoft.SharePoint;
  13.  
  14. namespace CommonScripts.Scripts
  15. {
  16.     public class SiteSettings
  17.     {
  18.         public static void CreateSiteColumn(SPSite oSite)
  19.         {
  20.             string group = "Custom Columns";
  21.             string fieldName = null;
  22.  
  23.             //Employee Name
  24.             fieldName = "Employee Name";
  25.             oSite.RootWeb.Fields.Add(fieldName, SPFieldType.Text, false);
  26.             (oSite.RootWeb.Fields[fieldName] as SPFieldText).Description = "Employee Name";
  27.             (oSite.RootWeb.Fields[fieldName] as SPFieldText).Group = group;
  28.             oSite.RootWeb.Fields[fieldName].Update();
  29.  
  30.             //Contract Duration
  31.             fieldName = "Contract Duration";
  32.             oSite.RootWeb.Fields.Add(fieldName, SPFieldType.Text, false);
  33.             (oSite.RootWeb.Fields[fieldName] as SPFieldText).Description = "Duration of the Contract";
  34.             (oSite.RootWeb.Fields[fieldName] as SPFieldText).Group = group;
  35.             oSite.RootWeb.Fields[fieldName].Update();
  36.  
  37.             //Earnings
  38.             fieldName = "Earnings";
  39.             oSite.RootWeb.Fields.Add(fieldName, SPFieldType.Currency, false);
  40.             (oSite.RootWeb.Fields[fieldName] as SPFieldCurrency).Description = "Earnings";
  41.             (oSite.RootWeb.Fields[fieldName] as SPFieldCurrency).MinimumValue = 0;
  42.             (oSite.RootWeb.Fields[fieldName] as SPFieldCurrency).DisplayFormat = SPNumberFormatTypes.TwoDecimals;
  43.             (oSite.RootWeb.Fields[fieldName] as SPFieldCurrency).Group = group;
  44.             oSite.RootWeb.Fields[fieldName].Update();
  45.  
  46.             //Contract Date
  47.             fieldName = "Contract Date";
  48.             oSite.RootWeb.Fields.Add(fieldName, SPFieldType.DateTime, false);
  49.             oSite.RootWeb.Fields[fieldName].Description = "Date of the Contract";
  50.             oSite.RootWeb.Fields[fieldName].Group = group;
  51.             oSite.RootWeb.Fields[fieldName].Update();
  52.         }
  53.  
  54.         public static void CreateContentType(SPSite oSite)
  55.         {
  56.             SPContentType baseType = oSite.RootWeb.AvailableContentTypes["Document"];
  57.             SPContentType jobContract = new SPContentType(baseType, oSite.RootWeb.ContentTypes, "Job Contract");
  58.             jobContract.Description = "Job Contract";
  59.             jobContract.FieldLinks.Add(new SPFieldLink(oSite.RootWeb.AvailableFields["Employee Name"]));
  60.             jobContract.FieldLinks.Add(new SPFieldLink(oSite.RootWeb.AvailableFields["Contract Duration"]));
  61.             jobContract.FieldLinks.Add(new SPFieldLink(oSite.RootWeb.AvailableFields["Earnings"]));
  62.             jobContract.FieldLinks.Add(new SPFieldLink(oSite.RootWeb.AvailableFields["Contract Date"]));
  63.             oSite.RootWeb.ContentTypes.Add(jobContract);
  64.         }
  65.     }
  66. }


Below is the code that make calls to methods CreateSiteColumn and CreateContentType:

Code Snippet
  1. using System;
  2. using System.Collections.Generic;
  3. using System.Text;
  4. using Microsoft.SharePoint;
  5.  
  6. namespace CommonScripts.Scripts
  7. {
  8.     class Program
  9.     {
  10.         static void Main(string[] args)
  11.         {
  12.             using (SPSite oSite = new SPSite("http://sharepoint2007:100"))
  13.             {
  14.                 SiteSettings.CreateSiteColumn(oSite);
  15.                 SiteSettings.CreateContentType(oSite);
  16.             }
  17.         }
  18.     }
  19. }

Download the solution here.

How to Create a Content Type by Feature with XML definition files

In this solution the WSP package was created using WSP Builder tool, which works well together with Visual Studio and allows the developer to focus on the solution and not worry as the WSP package will be created.

This is a productivity tool, it helps to automate a deploy task that is not part of the objective of the solution, which certainly would require a few hours to create a script to generate the WSP file.

Download the tool via the link: http://www.codeplex.com/wspbuilder

Similarly I will show the final solution and then describe the code contained in the solution.

Note the directory structure and files of the solution:
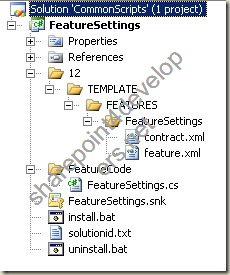
9
Figure 9 - Solution with Project of FeatureSettings

The main files to be installed are the XML files, because they contain the creation of Site Columns and Content Type of Job Contract.

Check out the feature.xml file:

Code Snippet
  1. <?xml version="1.0" encoding="utf-8"?>
  2. <Feature  Id="d9ad6f23-ee06-4521-a51c-65d35827e774"
  3.           Title="FeatureSettings"
  4.           Description="Job Contract Content Type and Fields"
  5.           Version="12.0.0.0"
  6.           ActivateOnDefault="True"
  7.           Hidden="FALSE"
  8.           Scope="Site"
  9.           DefaultResourceFile="core"
  10.           ReceiverAssembly="FeatureSettings, Version=1.0.0.0, Culture=neutral, PublicKeyToken=4e843e7c1420247a"
  11.           ReceiverClass="FeatureSettings.FeatureSettings"
  12.           xmlns="http://schemas.microsoft.com/sharepoint/">
  13.   <ElementManifests>
  14.     <ElementManifest Location="contract.xml"/>
  15.   </ElementManifests>
  16. </Feature>


The file Contrat.xml is referenced in the file feature.xml and contains all the definitions of Site Columns and Content Types.

Code Snippet
  1. <?xml version="1.0" encoding="utf-8"?>
  2. <Elements xmlns="http://schemas.microsoft.com/sharepoint/">
  3.   <ContentType ID="0x010100852E4863F66E174DBD7CD1A930818A02"
  4.                Name="Job Contract"
  5.                Group="Custom Content Types"
  6.                Description="Job Contract"
  7.                Version="0"
  8.                xmlns="http://schemas.microsoft.com/sharepoint/"
  9.                Hidden="False"
  10.                ReadOnly="False"
  11.                Sealed="False">
  12.     <FieldRefs>
  13.       <FieldRef ID="{83782324-6342-4fd3-a9ac-7e8aa0210ebe}" Name="Employee_x0020_Name" />
  14.       <FieldRef ID="{1f0d885a-22e7-4e1f-bc1d-5cd794d9dbcc}" Name="Contract_x0020_Duration" />
  15.       <FieldRef ID="{5205d996-6502-4823-9350-180c4e2f771c}" Name="Earnings" />
  16.       <FieldRef ID="{5b6173f8-d2c8-4cc2-84ac-8fc5541e8464}" Name="Contract_x0020_Date" />
  17.     </FieldRefs>
  18.   </ContentType>
  19.   <Field DisplayName="Employee Name"
  20.          Type="Text"
  21.          Required="FALSE"
  22.          ID="{83782324-6342-4fd3-a9ac-7e8aa0210ebe}"
  23.          StaticName="Employee_x0020_Name"
  24.          Name="Employee Name"
  25.          Description="Employee Name"
  26.          Group="Custom Columns"
  27.          xmlns="http://schemas.microsoft.com/sharepoint/" />
  28.   <Field DisplayName="Contract Duration"
  29.          Type="Text"
  30.          Required="FALSE"
  31.          ID="{1f0d885a-22e7-4e1f-bc1d-5cd794d9dbcc}"
  32.          StaticName="Contract_x0020_Duration"
  33.          Name="Contract Duration"
  34.          Description="Duration of the Contract"
  35.          Group="Custom Columns"
  36.          xmlns="http://schemas.microsoft.com/sharepoint/" />
  37.   <Field DisplayName="Earnings"
  38.          Type="Currency"
  39.          Required="FALSE"
  40.          ID="{5205d996-6502-4823-9350-180c4e2f771c}"
  41.          StaticName="Earnings"
  42.          Name="Earnings"
  43.          Description="Earnings"
  44.          Min="0" Decimals="2"
  45.          Group="Custom Columns"
  46.          xmlns="http://schemas.microsoft.com/sharepoint/" />
  47.   <Field DisplayName="Contract Date"
  48.          Type="DateTime"
  49.          Required="FALSE"
  50.          ID="{5b6173f8-d2c8-4cc2-84ac-8fc5541e8464}"
  51.          StaticName="Contract_x0020_Date"
  52.          Name="Contract Date"
  53.          Description="Date of the Contract"
  54.          Group="Custom Columns"
  55.          xmlns="http://schemas.microsoft.com/sharepoint/" />
  56. </Elements>


Note that the Content Type Job Contract references all Site Columns by the ID. The directory structure created is the same found at the 12 Hive (the directory C: \ Program Files \ Common Files \ Microsoft Shared \ web server extensions \ 12)

At this point we are not using the class FeatureSettings, which was created automatically by WSP Builder. In another lesson I will explain how Event Receivers work, but not this time, so comment out the class code.

The files *. bat in the project are batch files to install or uninstall the solution in SharePoint and were written manually.

Other key files (*. snk) and text were created automatically by WSP Builder to sign the assembly and for reference in creating the WSP package respectively.

To deploy the solution, create the WSP package as shown in Figure 10:
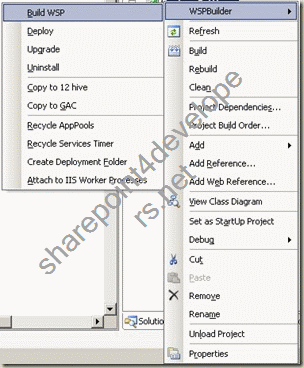
10
Figure 10 - Creating the WSP package

With the WSP package created, run the Install.bat and watch it run by the prompt shown in Figure 11:
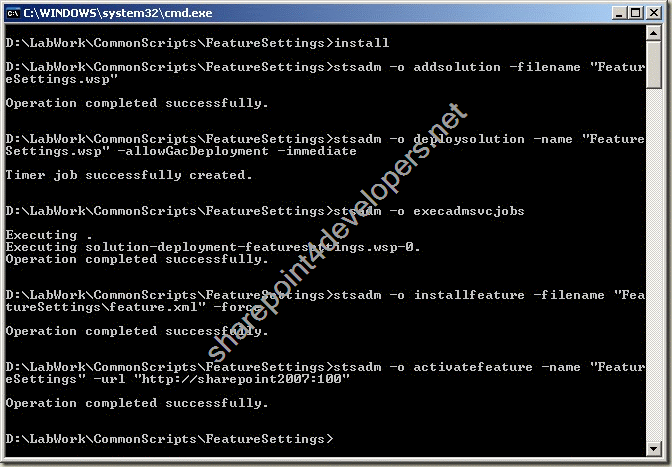
1D806A05AA43783B_329_10
Figure 11 – Running the batch file Install.bat

Download the solution here.

Content Types can be created in 3 ways, as exemplified in this post. They all have pros and cons.

We also saw that before creating content types an analysis of what metadata should be considered is necessary. Taxonomy is the answer.

Lesson 2 continues on Content Types in the next post, which shows the hierarchy of the types of Content Types.

References:
http://msdn.microsoft.com/en-us/library/ms472236(office.14).aspx
http://office.microsoft.com/en-us/sharepointserver/HA101495511033.aspx
http://www.endusersharepoint.com/
Book: SharePoint 2007 Development – WROX

Cheers,

Marcel Medina

Lesson 1 - Core SharePoint Features – Part IV

This post is the continuation of the lesson 1 Core SharePoint Features. In this post you can find the definition, utilization and example of views.

Hi folks,

This post is the continuation of the lesson 1 Core SharePoint Features. In this post you can find the definition, utilization and example of views.

As a resource, it makes easier the selection and display of items, specially if your list/library has many items.

Have a good reading!

Views

Basically a view is a visual representation of data in a List/Library based on a selection criteria, which defines how data is displayed.

Why to use views?

Imagine a library full of items, maybe with hundreds of documents. It becomes difficult to find a document visually in the middle of others. In order to facilitate its localization, a view can be created, because it works as a filter.

The view All Documents was created automatically when the library VIDocs was created firstly, according the last post. Figure 1 displays the All Documents view by default.

1D806A05AA43783B_221_0[1]
Figura 1 – Default View

At this moment we have few documents in the library, however, depending on the utilization, this list can grow and then it can be difficult to localize documents.

So let´s create a view based on the column FileType of our last example.

Open the menu that contains all views and select Create View, according Figure 2.

1D806A05AA43783B_221_1[1]
Figure 2 – Create a view

A set of views is displayed according Figure 3, each one with specific features, detailed in the Table 1.

1D806A05AA43783B_221_2[1]
Figura 3 – View Format

Type

Utilisation

Standard View

Displays list items or files like a traditional list on a Web page.

Calendar View

Displays a calendar items in a visual format that is similar to a desk or wall calendar. It is possible to apply daily, weekly, or monthly views in this format.

Datasheet View

Provides data in a format that can be edited, such as a table in a database or spreadsheet. This view can be helpful when performing large editing tasks or customization, or exporting data to a spreadsheet or database program. Datasheet view requires a control or program that is compatible with Windows SharePoint Services, such as Office Access 2007, and ActiveX control support.

Gantt View

Provides a visual view of data, with bars that track progress. A Gantt view can help to manage projects and see a quick overview of your data. It can be used to see which tasks overlap each other and to visualize overall progress.

Table 1 – Types of views available

Other types of views may be available. In the Figure 3 there is an additional type of view called Access view, which starts an Access file to create forms and reports that are based on the list.

Select the Standard View format.

We are about to create a view that groups documents of same type based on the column FileType, as displayed in Figures 4, 5, 6 and 7.

1D806A05AA43783B_221_3[1]
Figure 4 – View VIDocs (1/4)

1D806A05AA43783B_221_4[1]
Figure 5 – View VIDocs (2/4)

1D806A05AA43783B_221_5[1]
Figure 6 – View VIDocs (3/4)

1D806A05AA43783B_221_6[1]
Figure 7 – View VIDocs (4/4)

It needs to fill many fields (textbox / option fields) throughout the creation of view, according figures above. Depending on the view you need, other fields may be needed. You can find below a description in details of the displayed sections:

Section

Description

Name

Type the view name and check whether you want to define as default.

Audience

These options are available for selection:

  • Create a Personal View
    Only can be used by the owner.
  • Create a Public View
    Others can use it.

Columns

Show or hide columns by selecting the number for the order of the column in the view.

Sort

Choose whether and how the information needs to be sorted. It is possible to use two columns for the sort of view.

Filter

Displays all items or just a subset of the list.

Group By

Group items with the same value in their own section.

Totals

Count the number of items in a column.

Style

Style options to format the view:

  • Basic Table

  • Document Details

  • Newsletter

  • Newsletter, no lines

  • Shaded

  • Preview Pane

  • Default

Folders

Choose whether to create a view that doesn't include the folders — called a flat view.

Item Limit

Limit how many files can be viewed in the list or library, or how many files can be viewed on the same page.

Mobile

To view the list or library on a mobile device these options are available:

  • Make a Mobile View
    It creates a view for mobile devices.

  • Make this default mobile view
    Defines a default view.

Table 2 – View Configuration

The following view will be displayed after clicking OK, which is grouped by the FileType column, according Figure 8.

1D806A05AA43783B_221_7[1]
Figure 8 – View VIDocs (Grouped by FileType)

Notice that each FileType group displays the amount of files. Click the symbol (+) to expand the grouping and see all contained documents.

Lesson 1 is not finished yet, today you could learn about views. In the next post I am going to present you web parts.

Hope it could help!

Reference:
http://office.microsoft.com/en-us/sharepointtechnology/HA100215771033.aspx

Cheers,

Marcel Medina

Click here to read the same content in Portuguese.